SmartFonts
Smart Fonts is an Android Studio Library which makes it easy to use Custom Fonts (TTF or OTF) in your apps. It handles the Android text widgets (TextView, EditText, CheckBox, RadioButton...). You can add any other widgets easily, including your own classes!
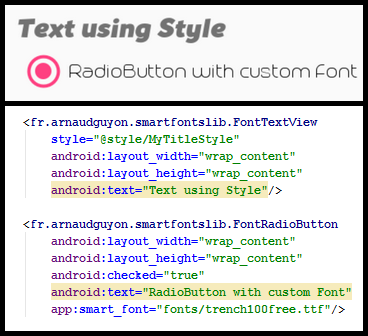
You can use Styles, and see the result directly in the Layout Editor!
A manager handles the caching of the fonts so that they are loaded only once. If a font is not used it is not loaded.
It is easy to integrate with gradle.

Important Notice
Since Android 8 (API 26) Google has introduced "Fonts in XML", so if your App targets API 26 or higher, consider using Google solution instead of this library. See https://developer.android.com/guide/topics/ui/look-and-feel/fonts-in-xml.html
Usage
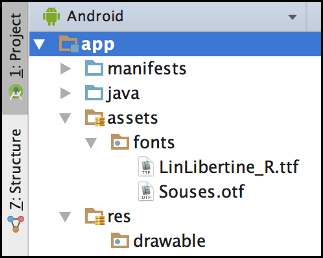
Before starting to code, you must copy your font files (.TTF or .ODT) in the "assets" folder of your application. This folder may not exist so you'll probably have to create it (usually app/scr/main/assets).
This is a best practice to create a subfolder "fonts" inside the assets folder. Copy your files in that "assets/fonts" folder.

In your string.xml file (or in a custom xml file), define names for these fonts. It is not mandatory, but it is a good practice so that it will be then easier to use (shorter names, no typing mistakes), and it will be faster to change the font without having to change all your layouts.
<resources>
    <string translatable="false" name="fontTitle">fonts/Souses.otf</string>
    <string translatable="false" name="fontNotice">fonts/LinLibertine_R.ttf</string>
</resources>
Now you can use the widgets from the library in your layouts.
The Class names are composed with "Font" + the usual Android class name: FontTextView, FontCheckBox, FontButton, ...
To use the new "smart_font" attribute, you'll have to add this in top of your layout:
xmlns:app="http://schemas.android.com/apk/res-auto"
<?xml version="1.0" encoding="utf-8"?>
<LinearLayout
    xmlns:android="http://schemas.android.com/apk/res/android"
    xmlns:app="http://schemas.android.com/apk/res-auto"
    android:layout_width="match_parent"
    android:layout_height="match_parent"
    android:orientation="vertical">

    <fr.arnaudguyon.smartfontslib.FontTextView
        android:layout_width="wrap_content"
        android:layout_height="wrap_content"
        android:text="Hello World"
        app:smart_font="@string/fontNotice" />

    ...
Use with styles
I recommend to always use styles in your projects (with or without this library). It is a little bit more work to do once, but so much time saved after!
To use the custom fonts in your style, simply add the "smart_font" attribute.
<style name="MyTitleStyle" parent="@android:style/Widget.TextView">
    <item name="smart_font">@string/fontTitle</item>
    <item name="android:textSize">16sp</item>
</style>
Then use it everywhere, no more need to define the "smart_font" attribute directly.
<fr.arnaudguyon.smartfontslib.FontTextView
    style="@style/MyTitleStyle"
    android:layout_width="wrap_content"
    android:layout_height="wrap_content"
    android:text="Hello Title Style"/>
Use with your own custom classes
You may have created you own components and you want to use the fonts and the caching system of the library. It is really easy to do if your class inherit from TextView (or its subclasses). Just add a call to the Manager like this:
public class MyCrazyRadioButton extends RadioButton {

    public MyCrazyRadioButton(Context context, AttributeSet attrs) {
        super(context, attrs);
        FontManager.getInstance().applyFont(this, attrs);   // add this call
    }

    public MyCrazyRadioButton(Context context, AttributeSet attrs, int defStyleAttr) {
        super(context, attrs, defStyleAttr);
        FontManager.getInstance().applyFont(this, attrs);   // add this call
    }
}
If your class does not inherit from any Android TextView class, then you can retrieve the Typeface from the FontManager and apply it by yourself:
    Typeface typeface = FontManager.getInstance().getTypeface(context, R.string.fontNotice);
    if (typeface != null) {
        mTextView.setTypeface(typeface);
    }
Installation with gradle
Add the following maven{} line to your PROJECT build.gradle file
allprojects {
    repositories {
        jcenter()
        maven { url "https://jitpack.io" }    // add this line
    }
}
Add the libary dependency to your APP build.gradle file
dependencies {
    compile 'com.github.smart-fun:SmartFonts:1.0.4'    // add this line
}
Library License
Copyright 2016 Arnaud Guyon
Licensed under the Apache License, Version 2.0 (the "License"); you may not use this file except in compliance with the License. You may obtain a copy of the License at
http://www.apache.org/licenses/LICENSE-2.0
Unless required by applicable law or agreed to in writing, software distributed under the License is distributed on an "AS IS" BASIS, WITHOUT WARRANTIES OR CONDITIONS OF ANY KIND, either express or implied. See the License for the specific language governing permissions and limitations under the License.
