TimeLine
一个简单的时间线控件,采用 RecyclerView 实现,无任何三方依赖库,一个纯净的库。主要特性:
- 可定制 timeline 的 icon 图标,每个图标可以通过 list 作为参数传入
- 可定制 item 布局,每个 item 中的 view 都可通过 anchor 注解来设置不同的 style
- 支持时间线的前景色和后景色,采用 src_in 方式覆盖
- 时间线进度可随意控制,可以实现 10%,15%,96%等进度
- 采用编译期注解,在运行期未使用反射
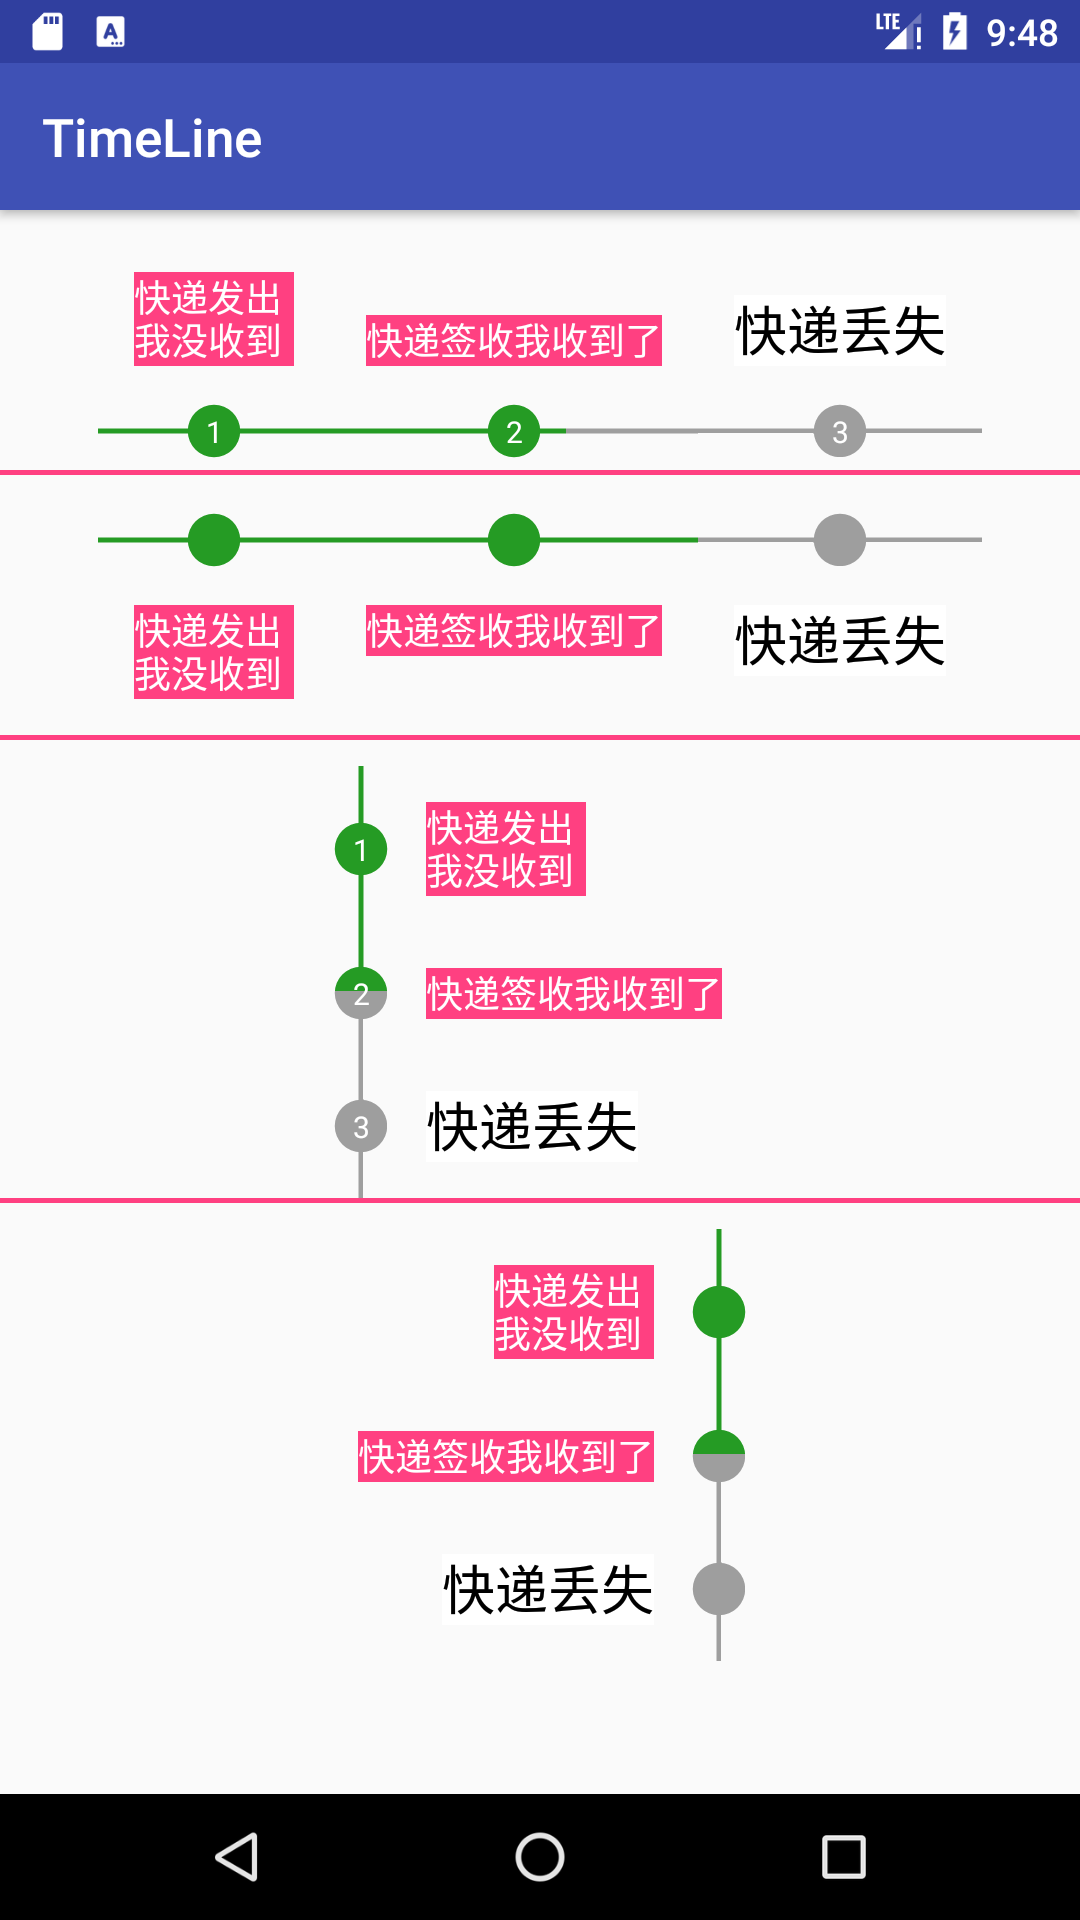
- 支持四种时间线位置,item 大小不同时会自动进行位置对齐。比如时间线在上方,所有的 item 会自动顶部对齐。
- 支持三种时间线模式
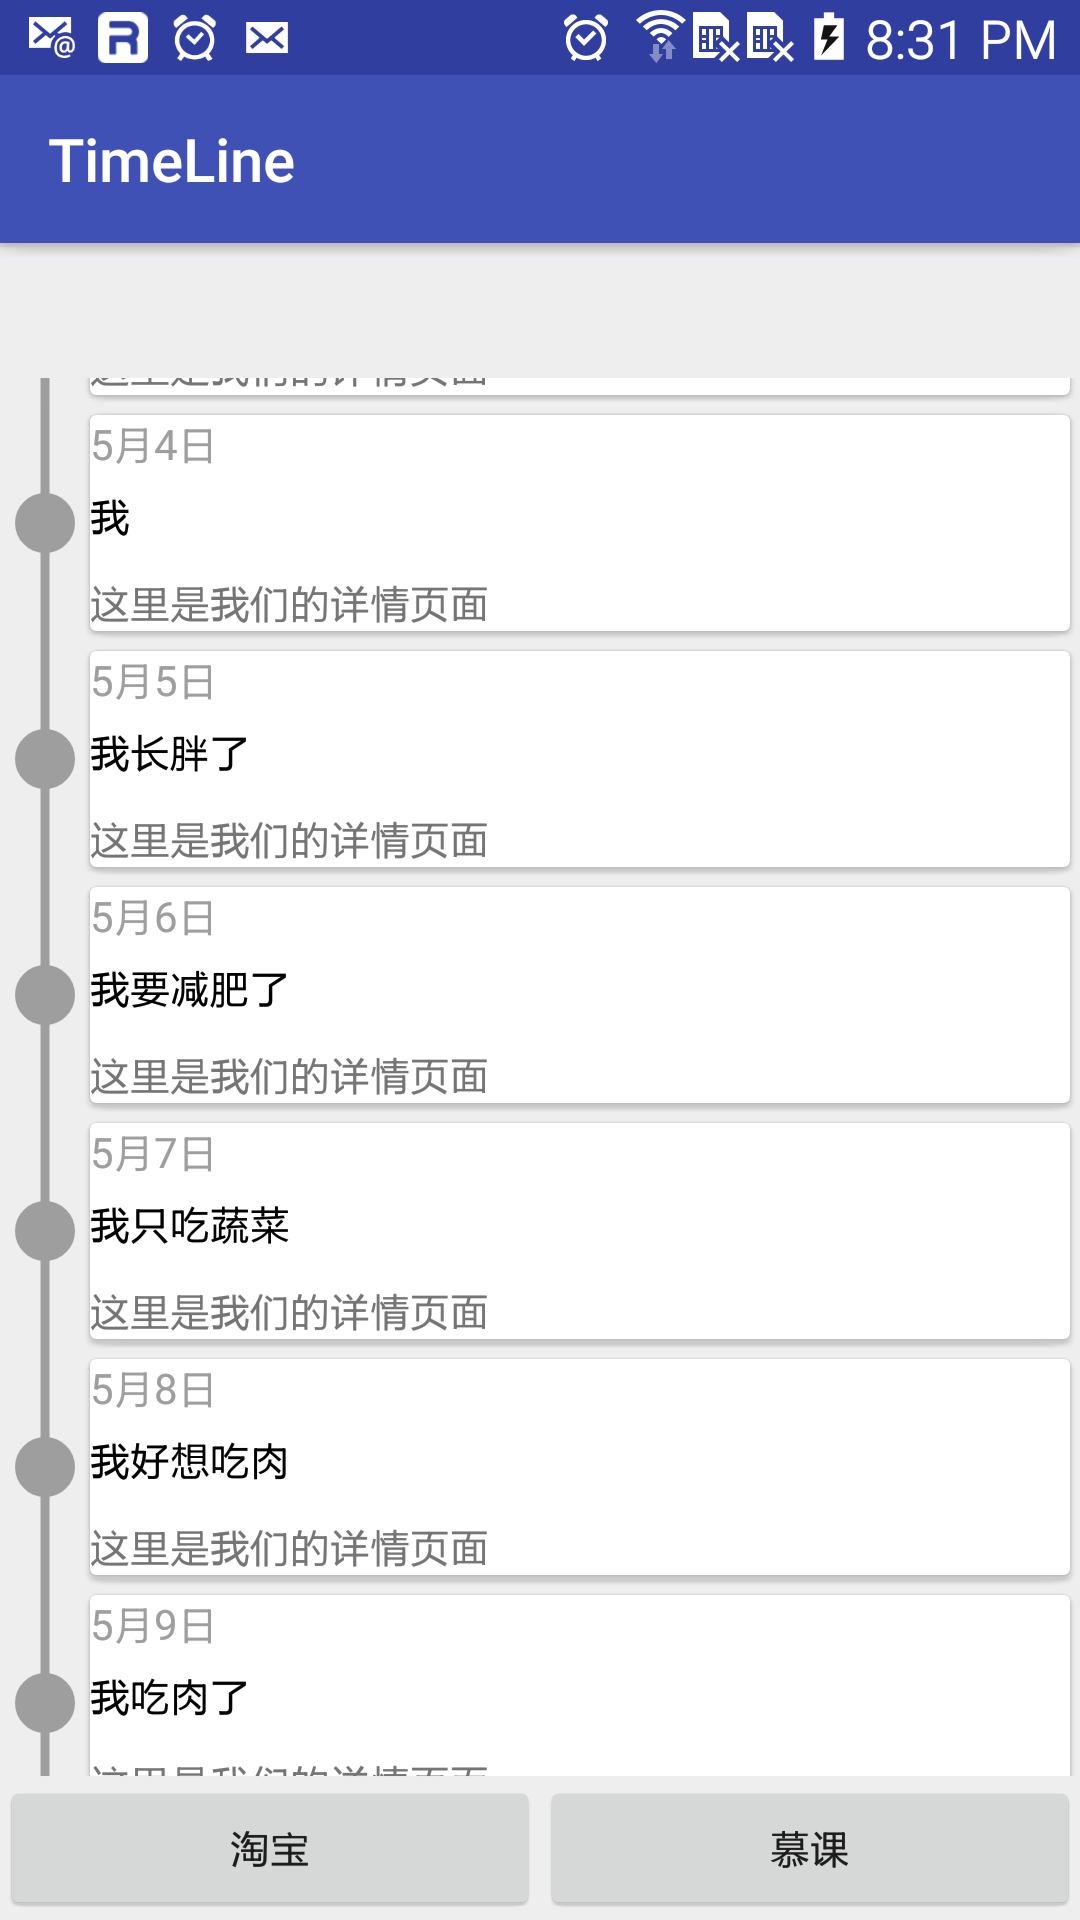
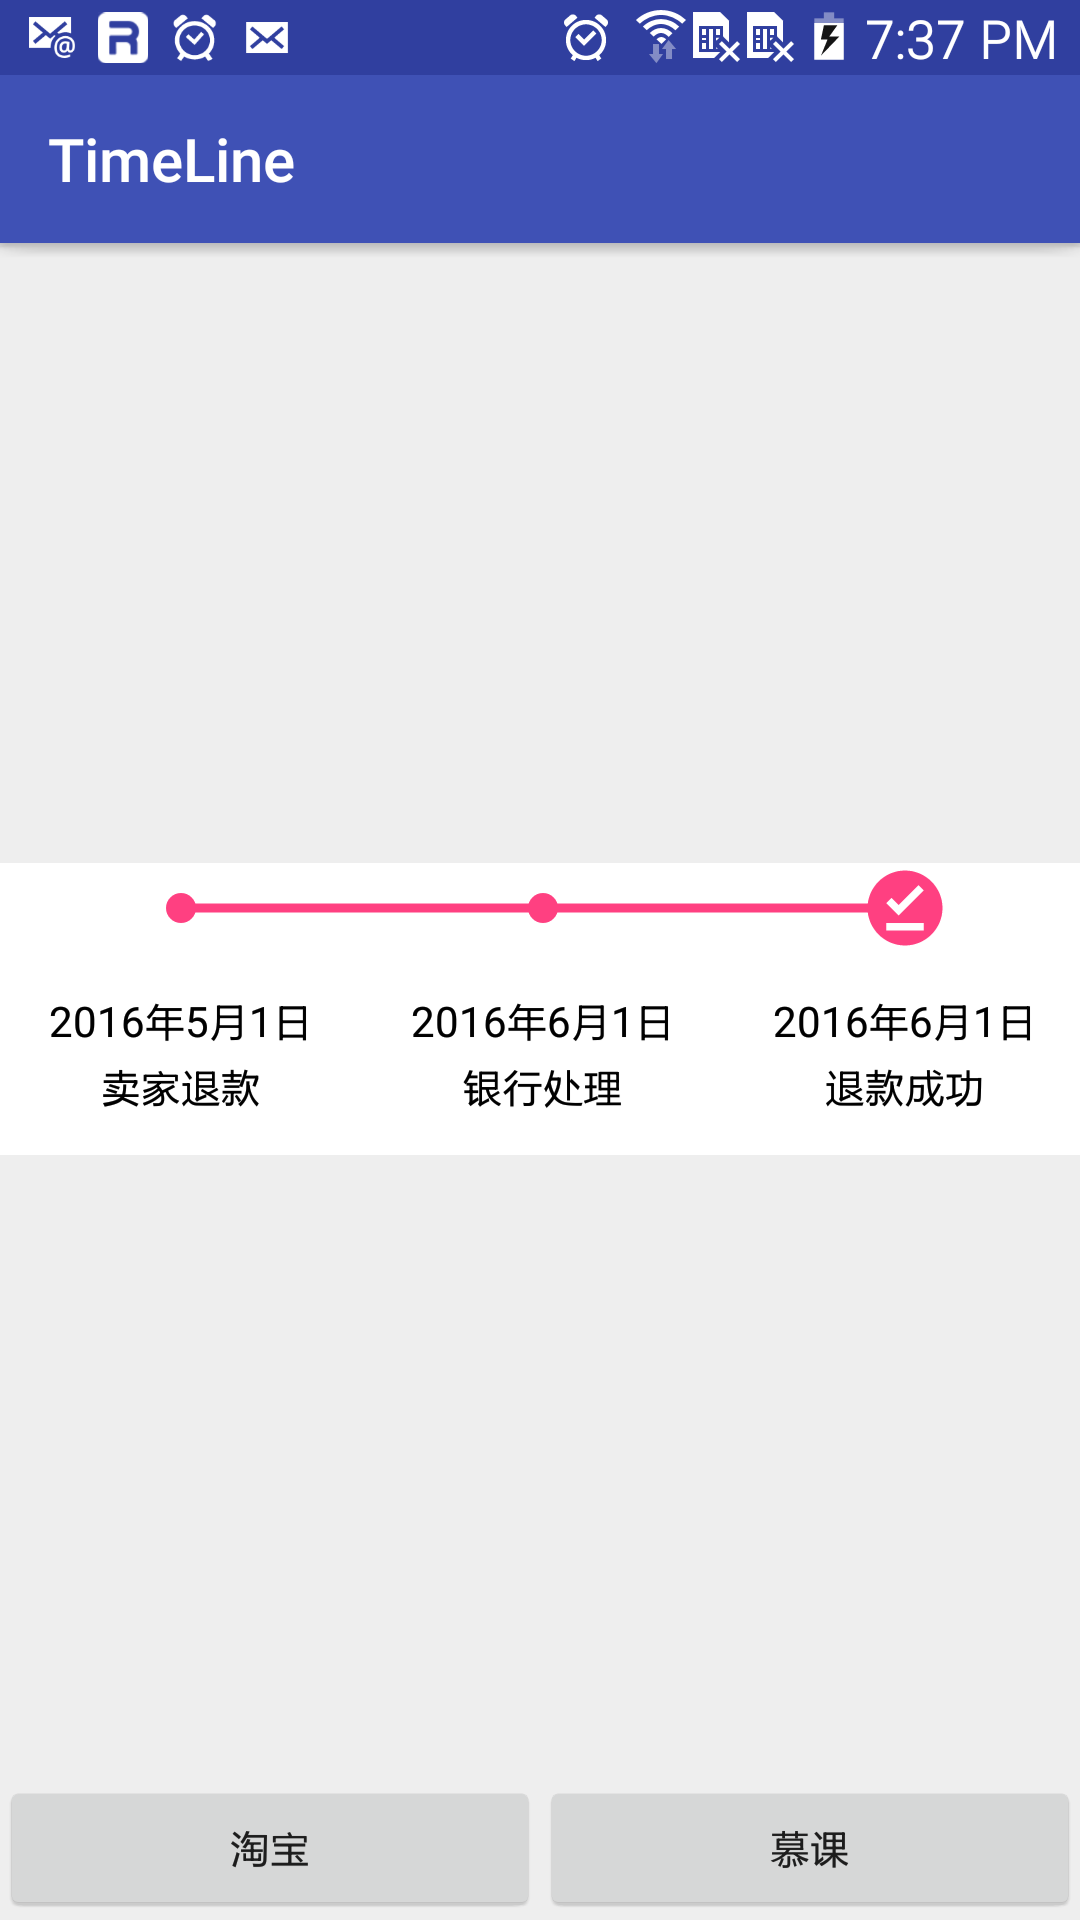
看两张效果图,仿淘宝退款,和一个不太标准的仿慕课:
0.2.4 更新:
新增可以控制 icon 大小的属性:
app:timeLineIconHeight="30dp"
app:timeLineIconWidth="30dp"
新增样式
app:strokeType="midEndPoint"
如图:
未设置该大小时会自动设置成为 timePadding 的三分之二;当其中一个设置另一个未设置时, 未设置的值会自动设置成为已设置的值。
可以设置 dividerNum 为浮点型,会自动调整进度,这种形式在 noEndPoint 模式下工作最好。
集成方式
    implementation 'com.rangaofei:sakatimeline:0.2.4'
    annotationProcessor 'com.rangaofei:JavaTimeLine:0.2.4'
然后修改 app 级别的 module 的 build.gradle 文件:
android {

    defaultConfig {

        //省略代码
        javaCompileOptions{
            annotationProcessorOptions.includeCompileClasspath=true
        }
    }
}
假如没出现问题的话就集成成功了
使用 StepView
StepView 基于注解
StepView 内部使用 apt 处理注解实现了 adapter,adapter 包含两种布局,key 和 value。目前推出的只需要使用 value 布局即可。
首先要定义一个 model,这个 model 要编写一些注解
@TimeLine(valueLayoutId = "R.layout.item_value")
public class StepViewModel {

    @TimeLineTextView(key = false, value = "R.id.value")
    public String text;

    public StepViewModel(String text) {
        this.text = text;
    }

    public String getText() {
        return text;
    }

    public void setText(String text) {
        this.text = text;
    }
}
注意,每个变量必须采用 public 修饰,否则获取不到变量的值(其实是目前我没有做任何 getter 和 setter 方法)
然后先 build 一次,在需要使用 model 的时候要写入
private AbstractTimeLineAdapter adapter;

private List<StepViewModel> stepViewModels = new ArrayList<>();
系统会自动生成一个 StepViewModelViewAdapter 文件,这个 adapter 需要传入一个 list 作为数据源, 这个 list 中的 item 类型必须设置为被标注为 TimeLine 的类。
stepViewModels.add(new StepViewModel("快递发出"));
stepViewModels.add(new StepViewModel("快递签收"));
stepViewModels.add(new StepViewModel("快递丢失"));
adapter = new StepViewModelAdapter(stepViewModels);
binding.tlv.setTimeLineConfig(adapter, TimeLineType.StepViewType.RIGHT_STEP_PROGRESS);
这样我们就完成了基本设置。 运行可以看到效果图:

注意:目前只支持 textview 的部分属性的不同样式设置,支持 imageview 的 src 显示。
同样是前边的类,稍微修改一下:
@TimeLine(valueLayoutId = "R.layout.item_value")
public class StepViewModel {

    @TimeLineTextView(key = false, id = "R.id.value", style = "R.style.StepView1", styleAnchor = "R.style.StepView2")
    public String text;
    @TimeLineAnchor({"R.id.value"})
    public boolean right;

    public StepViewModel(String text, boolean right) {
        this.text = text;
        this.right = right;
    }

    public String getText() {
        return text;
    }

    public void setText(String text) {
        this.text = text;
    }
}
我们为 TimeLineTextView 加上了 style 和 styleAnchor 的值,这两个值是自己定义的 style 样式,这些样式只包含部分 attr
    <attr name="android:textSize"/>
    <attr name="android:textColor"/>
    <attr name="android:textColorHint"/>
    <attr name="android:textColorLink"/>
    <attr name="android:textStyle"/>
    <attr name="android:typeface"/>
    <attr name="android:fontFamily"/>
    <attr name="android:shadowColor"/>
    <attr name="android:shadowDy"/>
    <attr name="android:shadowDx"/>
    <attr name="android:shadowRadius"/>
下面是示例中定义的两个 style:
<style name="StepView1" parent="AppTheme">
    <item name="android:textSize">14sp</item>
    <item name="android:textColor">@color/white</item>
</style>

<style name="StepView2" parent="AppTheme">
    <item name="android:textSize">20sp</item>
    <item name="android:textColor">@color/black</item>
    <item name="backgroundProxy">@color/white</item>
</style>
修改主界面代码:
stepViewModels.add(new StepViewModel("快递发出\n 我没收到", false));
stepViewModels.add(new StepViewModel("快递签收我收到了", false));
stepViewModels.add(new StepViewModel("快递丢失", true));
可以看到第三个 item 设置为 true 了,那么 StepViewModel 中的@TextView 注解中的 styleAnchor 将会生效, 其他未设置为 true 的 item 生效的将会是@TextView 注解中的 style。
背景可以是任意的 drawable 和 color,设置背景使用了动态代理。
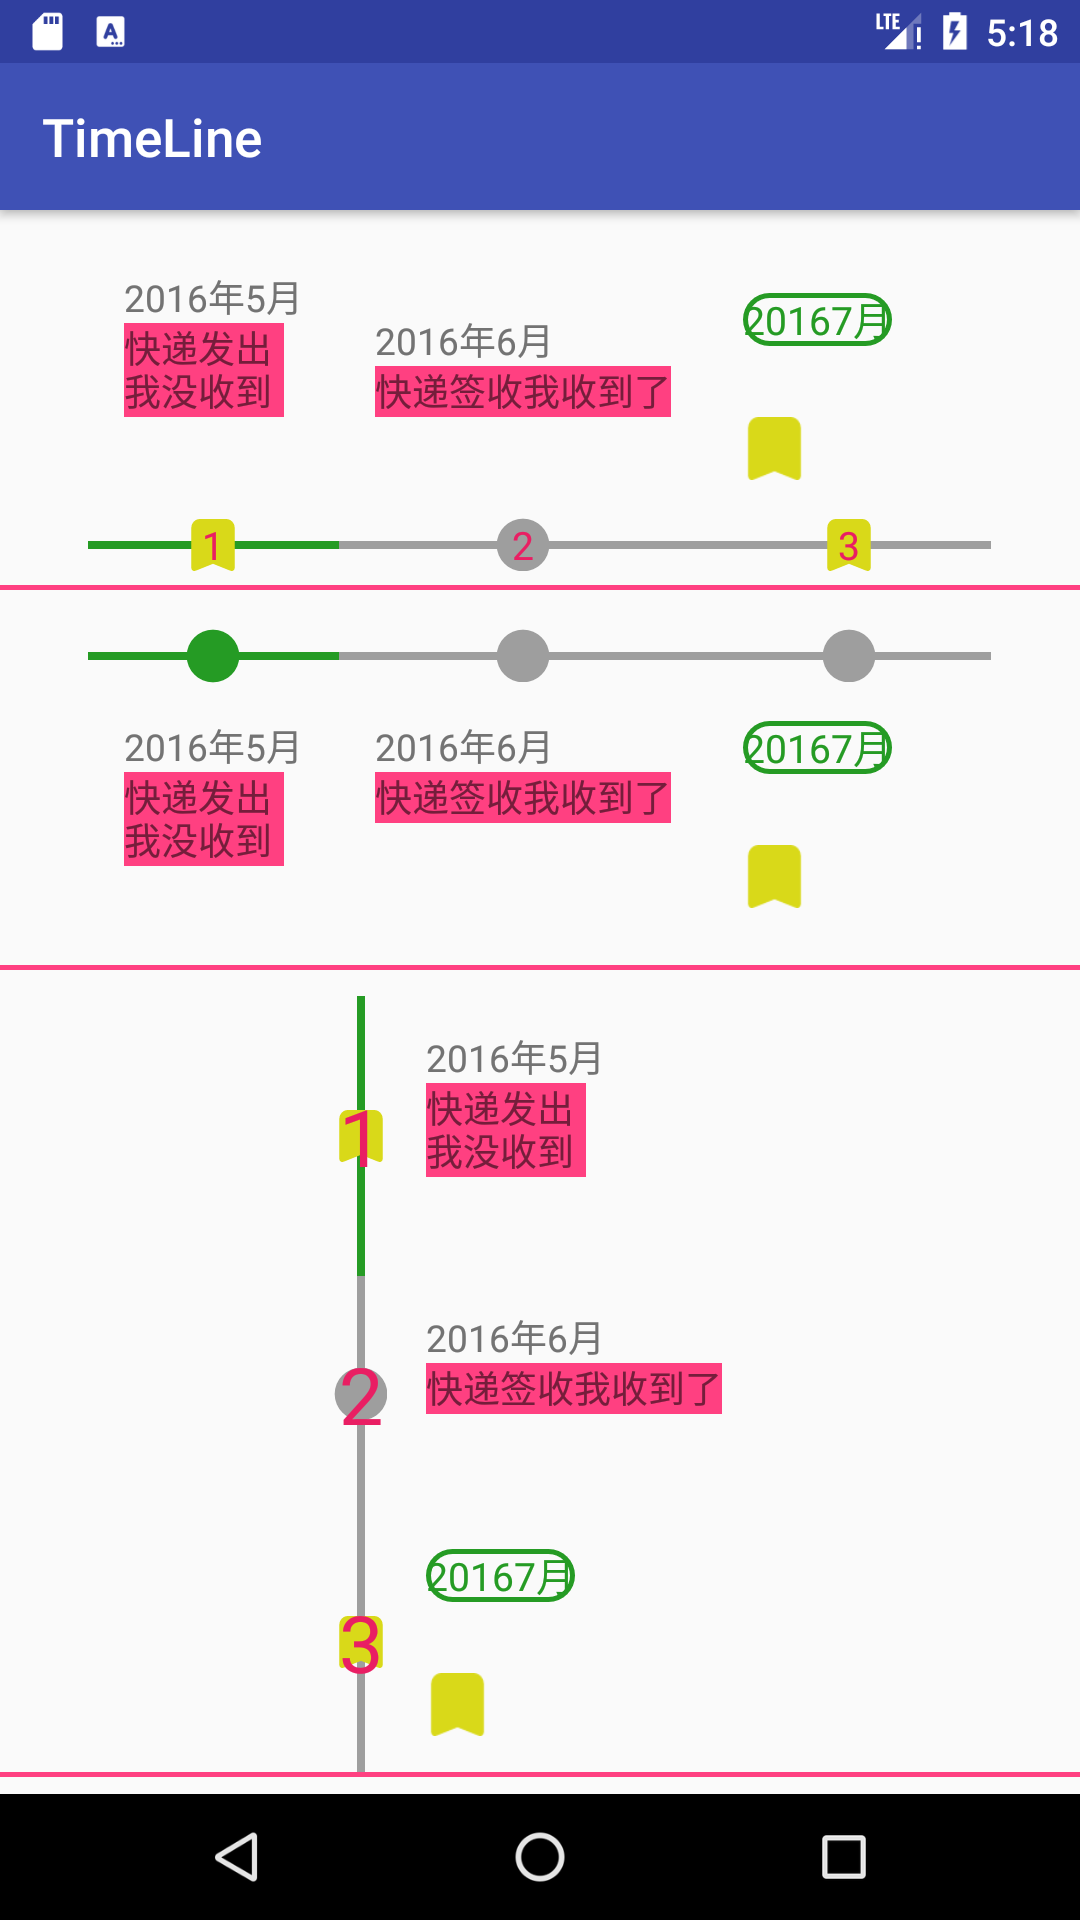
替换默认的圆为用户自定义的 drawable
首先要定义一个List<Drawable> list,这个 drawable 中添加要替换 index 位置的 drawable。
要注意添加的顺序,将会与 step 的顺序一致,假如传入 null,则会绘制原有的圆圈。 假如添加的 drawable 数量少于 index 位置的数量,则会循环利用
list = new ArrayList<>();
list.add(getResources().getDrawable(R.drawable.ic_order));
list.add(null);
((TimeLineView) findViewById(R.id.one)).
        setTimeLineConfig(adapter, TimeLineType.StepViewType.BOTTOM_STEP_PROGRESS, 1, list);
((TimeLineView) findViewById(R.id.two)).
        setTimeLineConfig(adapter, TimeLineType.StepViewType.TOP_STEP_PROGRESS, 1);
((TimeLineView) findViewById(R.id.three)).
        setTimeLineConfig(adapter, TimeLineType.StepViewType.LEFT_STEP_PROGRESS, 3, list);
((TimeLineView) findViewById(R.id.four)).
        setTimeLineConfig(adapter, TimeLineType.StepViewType.RIGHT_STEP_PROGRESS, 3);
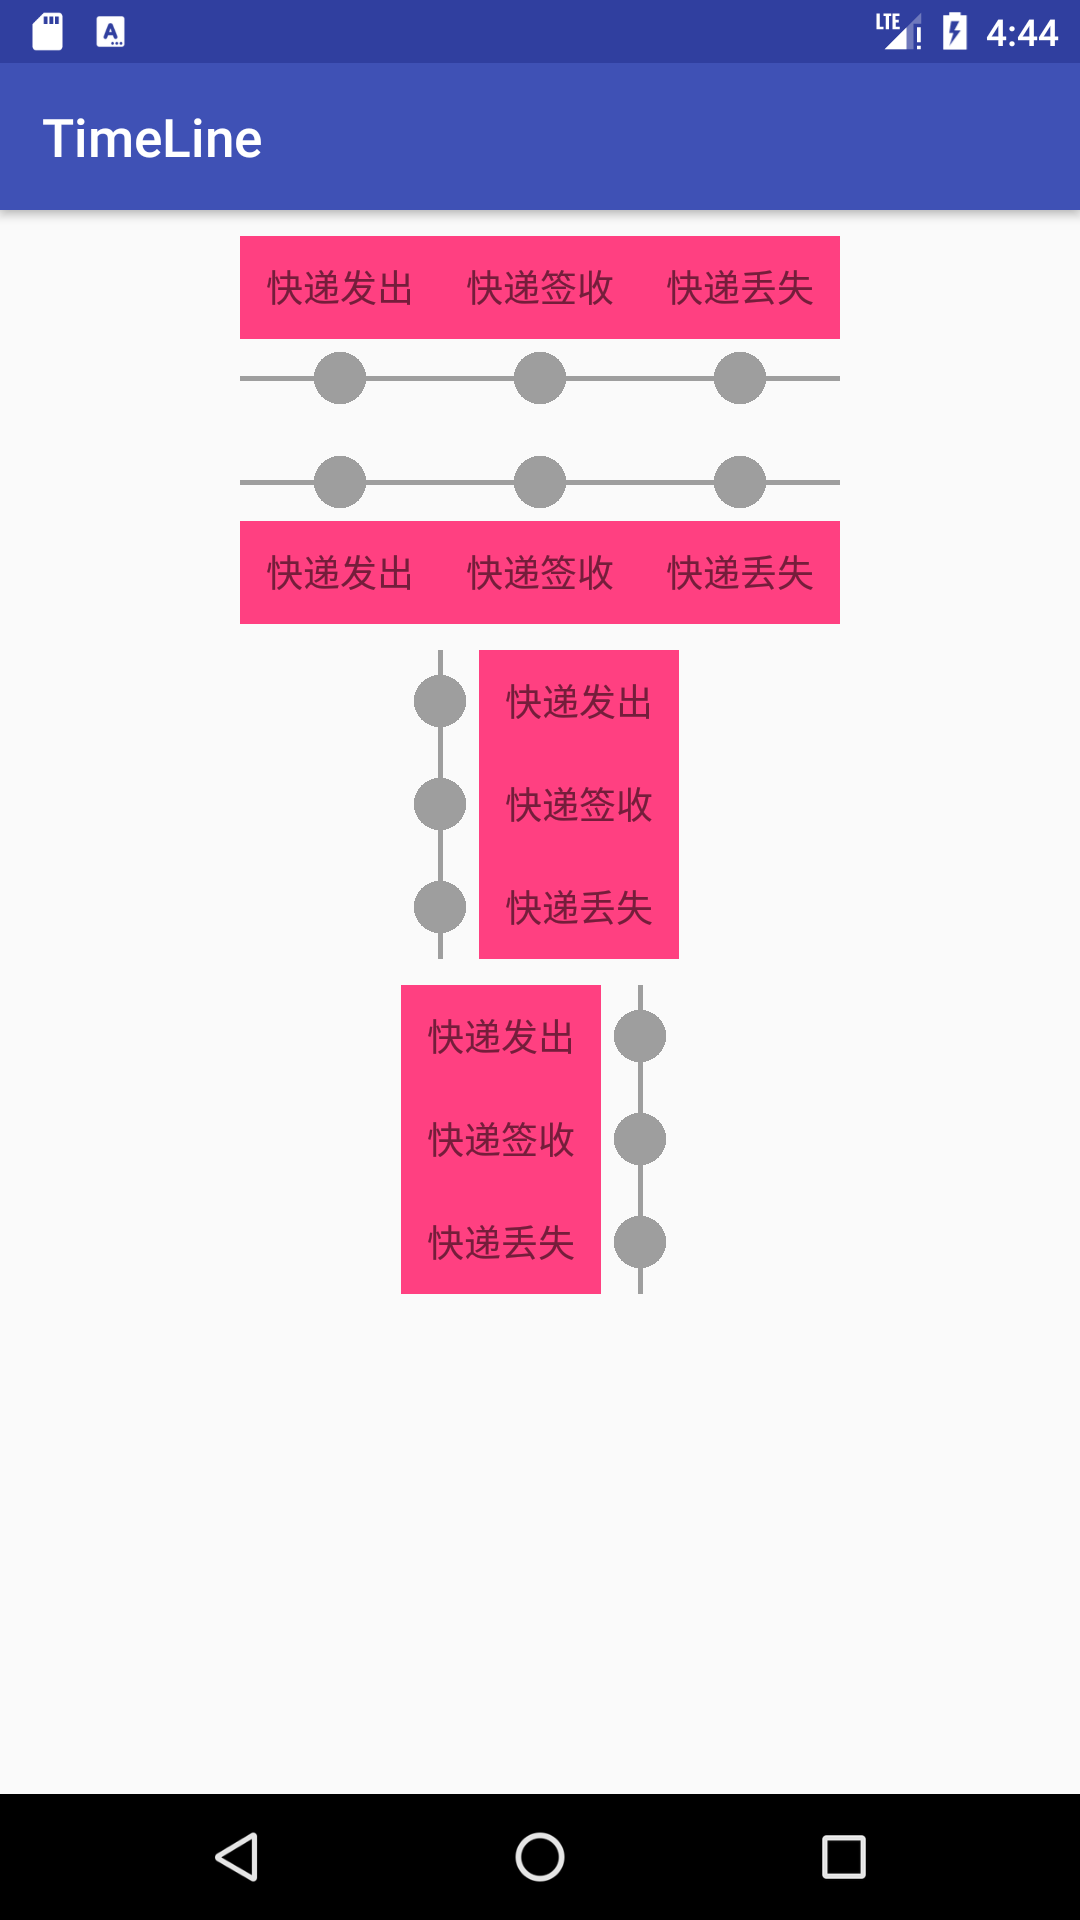
为 1 和 3 添加了自定义 drawable,看一下效果图
注解说明
@TimeLine
用于标记类,被标记的类将作为 model 使用
name 不为空的时候生成的 adapter 名称为 name,为空的时候生成的 adapter 名称为 model 的 name 加"Adapter"
keyLayoutId 用来设置 KeyViewHolder 的布局文件,必须是 string 类型,例如:"R.layout.item_key",
valueLayoutId 用来设置 ValueViewHolder 的布局文件,必须是 string 类型,例如:"R.layout.item_value"
这里的 id 必须和下文中将要介绍的 TimeLineTextView 和 TimeLineImageView 中的 key 对应,key 为 true,则必须对应 keyLayoutId, key 为 false,则必须对应 valueLayoutId。
TimeLineView 的接口
//初始化 TimeLine 的配置
void setTimeLineConfig(AbstractTimeLineAdapter adapter, TimeLineType type)
TimeLineType 的类型:
enum StepViewType implements TimeLineType {
        LEFT_STEP_PROGRESS,//左侧显示当前的步骤,右侧显示内容
        RIGHT_STEP_PROGRESS,//右侧显示当前的步骤,左侧显示内容
        TOP_STEP_PROGRESS,//上侧显示当前的步骤,下侧显示内容
        BOTTOM_STEP_PROGRESS,//下侧显示当前的步骤,上侧显示内容
    }
//升级当前分隔点,默认使用动画,可以通过设置 showAnim 来设置
public void updateDividerNum(int dividerNum)
public void updateDividerNum(int dividerNum, boolean showAnim)
TimeLineView 的 xml 配置
timePadding
空白位置的大小,也就是用来显示时间轴的宽度(纵向)或者高度(横向) 设置后,自定义时间轴指示器 drawable 的默认宽和高均为此值的 2/3; 默认的时间轴指示器的半径为此值的 1/2.
timeStrokeWidth
时间轴的粗细。默认值是 10dp。
timeStrokeColor
时间轴的颜色。默认是灰色。
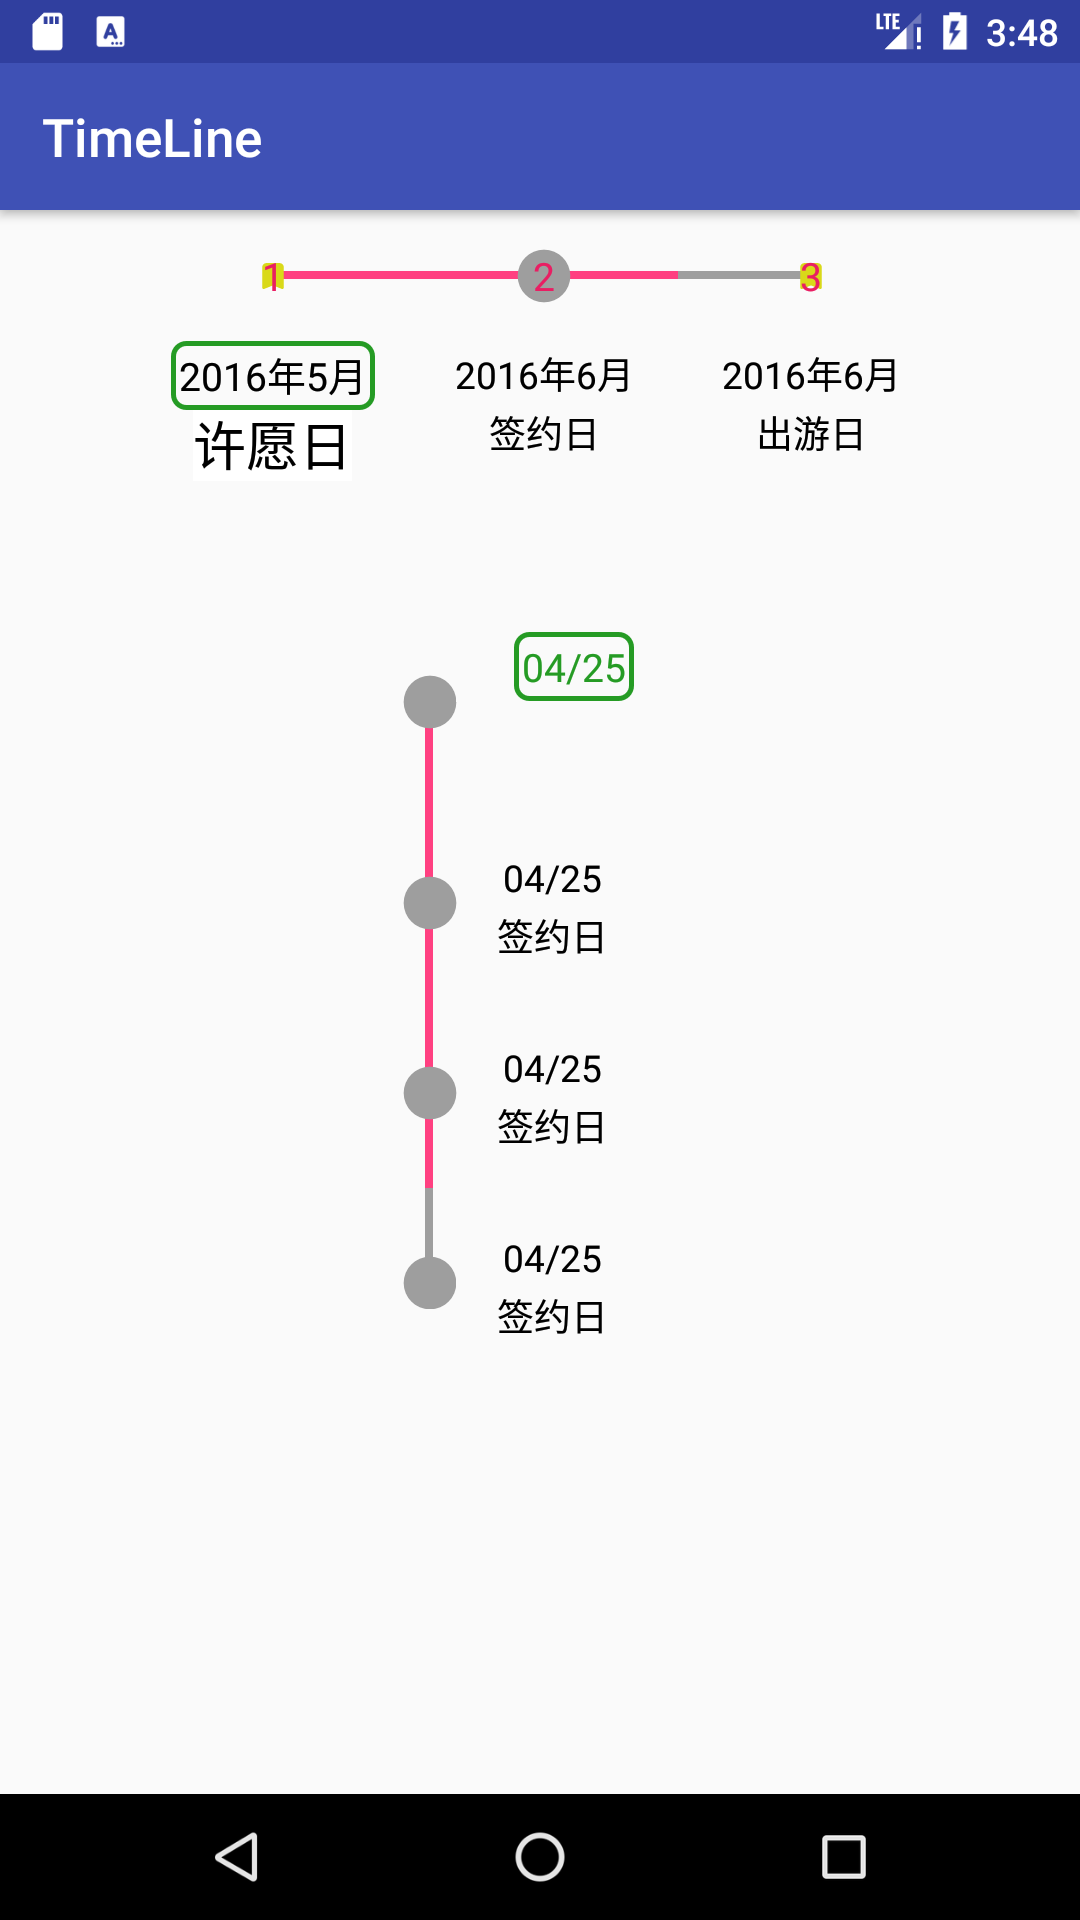
strokeType
时间轴的类型。有三种:normal,midEndPoint 和 noEndPoint。如图所示
timeLineType
时间轴的位置,共有四种:left、right、top、bottom
timeIndexColor
显示序号的颜色
timeIndexSize
显示序号的字的大小
stepShowOrder
是否显示序号
stepPreColor
设置前景色
stepAfterColor
设置后景色
style 可以设置的属性
visibleProxy
设置可见性,visible,invisible,gone,和 view 的可见性一致
backgroundProxy
设置背景,和 view 的 background 一致
clickProxy
设置可点击,与 view 的 clickable 一致
最后,有建议的朋友可以邮箱或者微信:
微信: