CustomPopwindow
封装通用 PopupWindow,CustomPopWindow,使用链式的方式配置并显示
由于每次写 PopupWindow 都要写很多重复代码,因此简单的封装了一个 CustomPopWindow.封装了 PopupWindow 的一些常用 API,使用 Builder 模式,就像写 AlertDialog 一样,链式配置。
相关博客
1,通用 PopupWindow,几行代码搞定 PopupWindow 弹窗
2, 通用 PopupWindow,几行代码搞定 PopupWindow 弹窗(续)
3, 从源码剖析 PopupWindow 兼容 Android 6.0 以上版本点击外部不消失
Usage
由于 1.0.0 版本 是托管到 Jcenter 的,添加如下依赖:
Add the dependency to your build.gradle.
dependencies {
    compile 'com.example.zhouwei.library:library:1.0.0'
}
2.x 版本 代码托管到 Jitpack, 需要如下依赖:
- Add it in your root build.gradle :
allprojects {
    epositories {
        ...
        maven {
            url 'https://jitpack.io'

        }

}
- Add the dependency
dependencies {
    compile 'com.github.pinguo-zhouwei:CustomPopwindow:2.1.1'
}
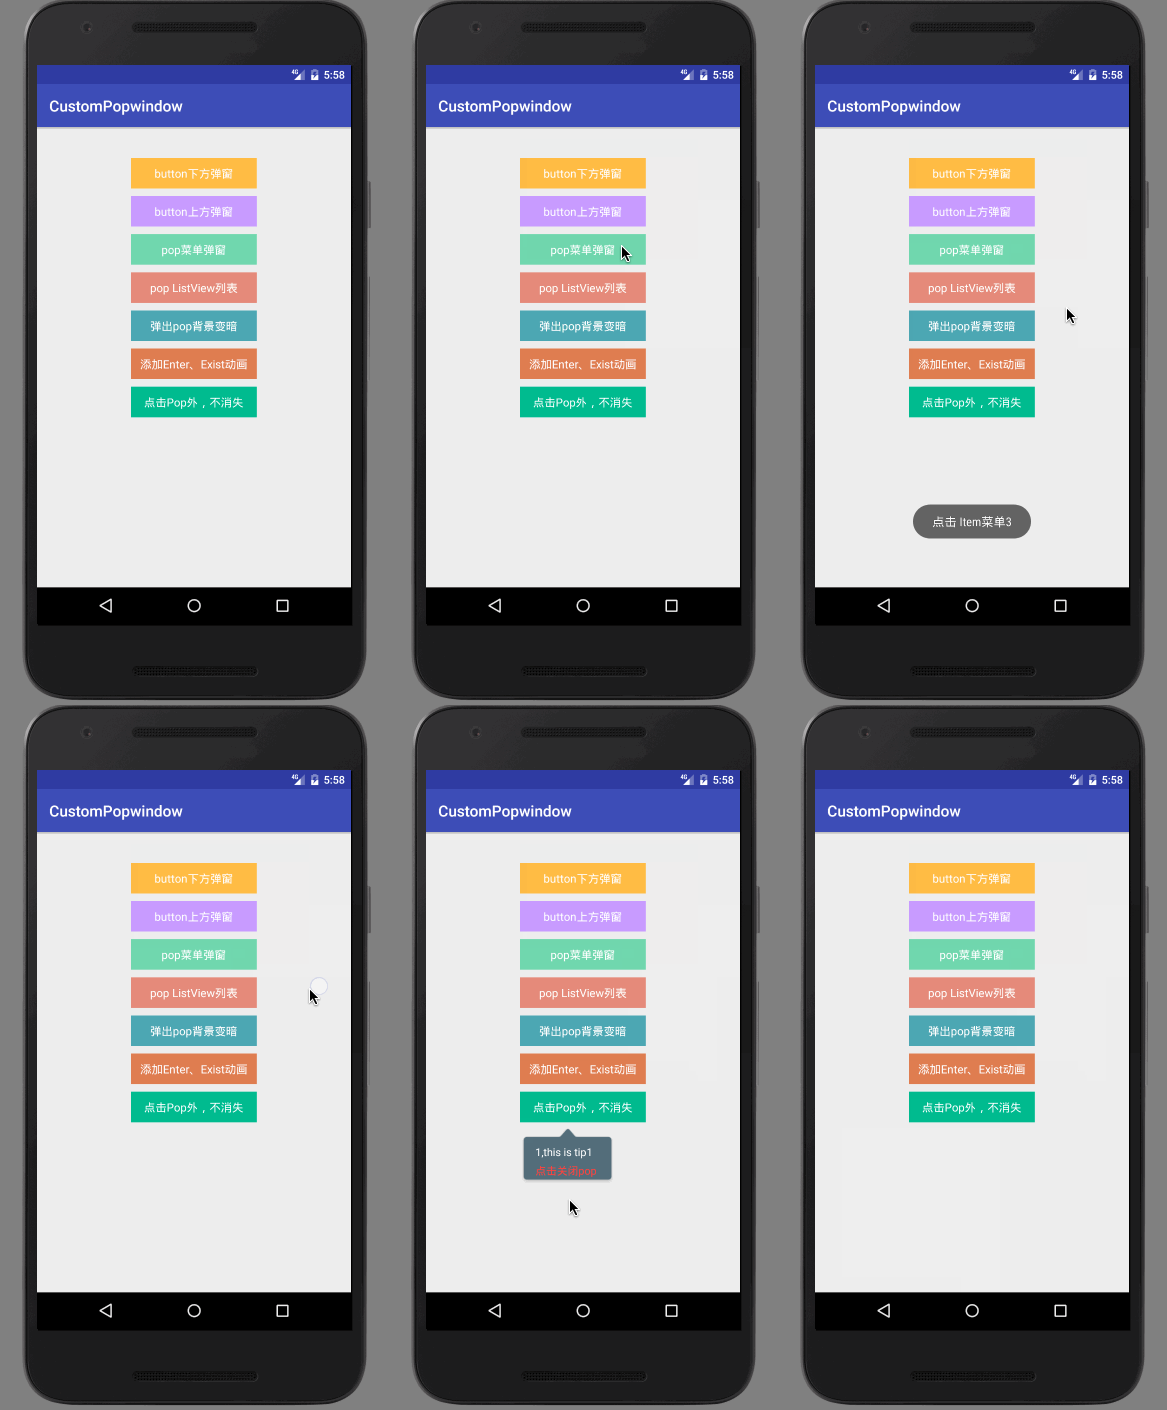
示例效果图:

更新日志
v2.0.0:
- 1,添加弹出 PopupWindow 同时背景变暗的配置,添加配置动画
v2.1.0:
- 1, 兼容 Android 6.0 、Android 7.0 点击 PopupWindow 之外的区域可以控制 显示/关闭 popupWindow
- 2, 可以获取到 PopupWindow 实例
使用方法
更新 1:背景变暗配置示例:
   //创建并显示 popWindow
 mCustomPopWindow= new CustomPopWindow.PopupWindowBuilder(this)
                .setView(contentView)
                .enableBackgroundDark(true) //弹出 popWindow 时,背景是否变暗
                .setBgDarkAlpha(0.7f) // 控制亮度
                .create()
                .showAsDropDown(mButton5,0,20);
更新 2:显示消失动画配置:
 CustomPopWindow popWindow = new CustomPopWindow.PopupWindowBuilder(this)
                .setView(R.layout.pop_layout1)
                .setFocusable(true)
                .setOutsideTouchable(true)
                .setAnimationStyle(R.style.CustomPopWindowStyle) // 添加自定义显示和消失动画
                .create()
                .showAsDropDown(mButton1,0,10);
更新 3:点击 PopupWindow 以外区域不让关闭(默认 DisMiss):
 mPopWindow = new CustomPopWindow.PopupWindowBuilder(this)
                .setView(view)
                .enableOutsideTouchableDissmiss(false)// 设置点击 PopupWindow 之外的地方,popWindow 不关闭,如果不设置这个属性或者为 true,则关闭
                .create();

        mPopWindow.showAsDropDown(mButton7,0,10);
1,简便写法
CustomPopWindow popWindow = new CustomPopWindow.PopupWindowBuilder(this)
                .setView(R.layout.pop_layout1)//显示的布局,还可以通过设置一个 View
           //     .size(600,400) //设置显示的大小,不设置就默认包裹内容
                .setFocusable(true)//是否获取焦点,默认为 ture
                .setOutsideTouchable(true)//是否 PopupWindow 以外触摸 dissmiss
                .create()//创建 PopupWindow
                .showAsDropDown(mButton1,0,10);//显示 PopupWindow
以上就是弹出一个简单的 PopupWindow,是不是看起来很优雅和简单,还可以简单一点:
CustomPopWindow popWindow = new CustomPopWindow.PopupWindowBuilder(this)
                .setView(R.layout.pop_layout1)//显示的布局
                .create()//创建 PopupWindow
                .showAsDropDown(mButton1,0,10);//显示 PopupWindow
如果是一个简单的只展示文案的弹窗,就可以只设置一个 View,就可以了,很简单吧!!!
2,展示一个 PopupWindow 弹窗菜单(像手机 QQ,微信的顶部菜单)
View contentView = LayoutInflater.from(this).inflate(R.layout.pop_menu,null);
        //处理 popWindow 显示内容
        handleLogic(contentView);
        //创建并显示 popWindow
        mCustomPopWindow= new CustomPopWindow.PopupWindowBuilder(this)
                .setView(contentView)
                .create()
                .showAsDropDown(mButton3,0,20);
如果 PopupWindow 展示的内容需要在程序代码中设置或者响应点击事件等,可以现获取到这个 View,然后处理一些显示和点击事件逻辑,再交给 CustomPopWindow 创建显示。比如响应菜单点击事件的逻辑处理:
 /**
     * 处理弹出显示内容、点击事件等逻辑
     * @param contentView
     */
    private void handleLogic(View contentView){
        View.OnClickListener listener = new View.OnClickListener() {
            @Override
            public void onClick(View v) {
                if(mCustomPopWindow!=null){
                    mCustomPopWindow.dissmiss();
                }
                String showContent = "";
                switch (v.getId()){
                    case R.id.menu1:
                        showContent = "点击 Item 菜单 1";
                        break;
                    case R.id.menu2:
                        showContent = "点击 Item 菜单 2";
                        break;
                    case R.id.menu3:
                        showContent = "点击 Item 菜单 3";
                        break;
                    case R.id.menu4:
                        showContent = "点击 Item 菜单 4";
                        break;
                    case R.id.menu5:
                        showContent = "点击 Item 菜单 5" ;
                        break;
                }
                Toast.makeText(MainActivity.this,showContent,Toast.LENGTH_SHORT).show();
            }
        };
        contentView.findViewById(R.id.menu1).setOnClickListener(listener);
        contentView.findViewById(R.id.menu2).setOnClickListener(listener);
        contentView.findViewById(R.id.menu3).setOnClickListener(listener);
        contentView.findViewById(R.id.menu4).setOnClickListener(listener);
        contentView.findViewById(R.id.menu5).setOnClickListener(listener);
    }
}
3,展示一个 ListView,其实跟上面是一样的,这里贴一下实例代码:
private void showPopListView(){
        View contentView = LayoutInflater.from(this).inflate(R.layout.pop_list,null);
        //处理 popWindow 显示内容
        handleListView(contentView);
        //创建并显示 popWindow
        mListPopWindow= new CustomPopWindow.PopupWindowBuilder(this)
                .setView(contentView)
                .size(ViewGroup.LayoutParams.MATCH_PARENT,ViewGroup.LayoutParams.MATCH_PARENT)//显示大小
                .create()
                .showAsDropDown(mButton4,0,20);
    }

    private void handleListView(View contentView){
        RecyclerView recyclerView = (RecyclerView) contentView.findViewById(R.id.recyclerView);
        LinearLayoutManager manager = new LinearLayoutManager(this);
        manager.setOrientation(LinearLayoutManager.VERTICAL);
        recyclerView.setLayoutManager(manager);
        MyAdapter adapter = new MyAdapter();
        adapter.setData(mockData());
        recyclerView.setAdapter(adapter);
        adapter.notifyDataSetChanged();

    }
联系方式
简书:http://www.jianshu.com/u/35167a70aa39
掘金:https://juejin.im/user/56949a9960b2e058a42be0ba
公众号:Android 技术杂货铺
QQ 技术交流群:155971357
欢迎关注我的公众号,第一时间获取我的博客更新提醒,以及更多有价值的原创 Android 干货文章、职场经验、面试技巧等等。 长按下方二维码即可关注。

License
   Copyright (C) 2017 zhouwei

   Licensed under the Apache License, Version 2.0 (the "License");
   you may not use this file except in compliance with the License.
   You may obtain a copy of the License at

       http://www.apache.org/licenses/LICENSE-2.0

   Unless required by applicable law or agreed to in writing, software
   distributed under the License is distributed on an "AS IS" BASIS,
   WITHOUT WARRANTIES OR CONDITIONS OF ANY KIND, either express or implied.
   See the License for the specific language governing permissions and
   limitations under the License.
