ClipPathLayout

![]()

Android 中实现不规则图形的布局
及由此扩展的转场动画布局
效果展示
不规则图形
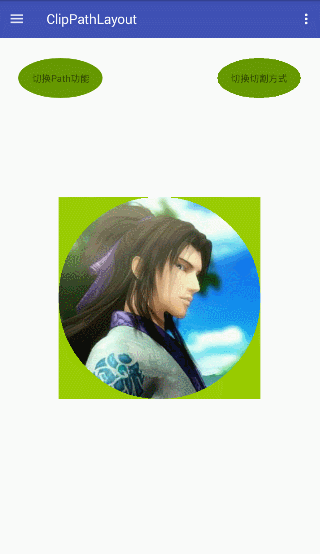
将方形图片裁剪成圆形并且让圆形 View 的 4 角不接收触摸事件

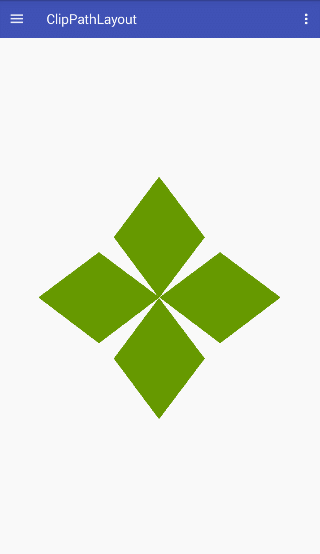
很多游戏都会有方向键,曾经我也做过一个小游戏,但是在做方向键的时候遇到一个问题,4 个方向按钮的位置会有重叠,导致局部地方会发生误触. 当时没有特别好的解决办法,只能做自定义 View,而自定义 View 特别麻烦,需要重写 onTouchEvent 和 onDraw 计算落点属于哪个方向,并增加点击效果. 简单的自定义 View 会丧失很多 Android 自带的一些特性,要支持这些特性又繁琐而复杂. 下面借助于 ClipPathLayout 用 4 个菱形按钮实现的方向控制键很好的解决了这个问题
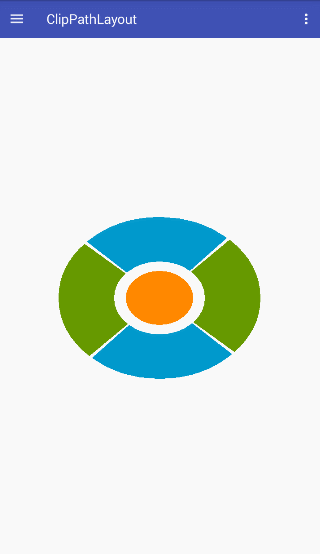
对于遥控器的按键的模拟同样有上述问题,一般只能采用自定义 View 实现,较为繁琐. 以下是借助于 ClipPathLayout 实现的遥控器按钮,由于没有美工切图,比较丑,将就下吧
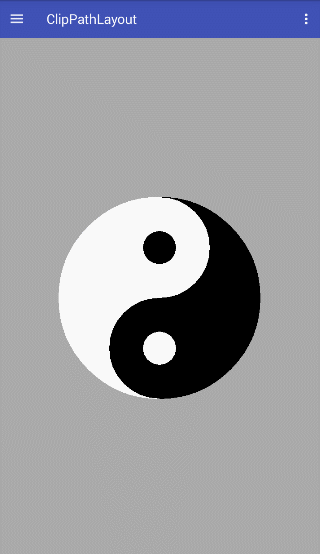
甚至我们可以将不连续的图形变成一个 View,比如做一个阴阳鱼的按钮
转场动画
两个 View 的场景切换效果,Android 原生自带的场景切换效果大部分是由动画实现的平移,缩小,暗淡. 原生比较少带有那种 PPT 播放的切换效果,一些第三方库实现的效果一般是由在 DecorView 中添加一层 View 来实现较为和谐的切换, 沪江开心词场里使用的就是这种动画,这种动画很棒,但是也有一个小缺点,就是在切换的过程中,切换用的 View 和即将要切换的 View 没有什么关系. 借助于 ClipPathLayout 扩展的 TransitionFrameLayout 也可以实现较为和谐的切换效果,由于是示例,不写太复杂的场景,以下仅用两个 TextView 作为展示
![]()
在浏览 QQ 空间和使用 QQ 浏览器的过程看到腾讯的广告切换效果也是很不错的,这里借助于 TransitionFrameLayout 也可以实现这种效果
![]()
其实大部分的场景切换应该是用在 Fragment 中,这里也用 TransitionFragmentContainer 实现了 Fragment 的场景切换效果
![]()
使用
添加依赖
    allprojects {
        repositories {
            ...
            maven { url 'https://www.jitpack.io' }
        }
    }
在 app module 中的 build.gradle 中添加依赖
    dependencies {
            implementation 'com.github.dqh147258:ClipPathLayout:1.1.0'
    }
如果依然使用 Jcenter 版本则是
implementation 'com.yxf:clippathlayout:1.0.+'
不规则图形布局的使用
当前实现了三个不规则图形的布局
- ClipPathFrameLayout
- ClipPathLinearLayout
- ClipPathRelativeLayout
如果有其他布局要求,请自定义,参见自定义 ClipPathLayout
ClipPathLayout 是一个接口,以上布局都实现了 ClipPathLayout 接口,并且具备父类的功能.
要实现不规则图形,其实要操作的并不是父布局,而是子 View. 我们需要给子 View 添加一些信息,这样父布局才知道应该如何去实现这个不规则图形.
这里以最简单的圆形 View 为例.
在一个实现了 ClipPathLayout 接口的 ViewGroup(以 ClipPathFrameLayout 为例)中添加一个子 View(ImageView).
<com.yxf.clippathlayout.impl.ClipPathFrameLayout xmlns:android="http://schemas.android.com/apk/res/android"
    android:id="@+id/clip_path_frame_layout"
    android:layout_width="match_parent"
    android:layout_height="match_parent">

    <ImageView
        android:id="@+id/image"
        android:layout_width="300dp"
        android:layout_height="300dp"
        android:layout_gravity="center"
        android:src="@mipmap/image" />

</com.yxf.clippathlayout.impl.ClipPathFrameLayout>
mImageView = mLayout.findViewById(R.id.image);
然后构建一个 PathInfo 对象
new PathInfo.Builder(new CirclePathGenerator(), mImageView)
    .setApplyFlag(mApplyFlag)
    .setClipType(mClipType)
    .setAntiAlias(false)
    .create()
    .apply();
搞定!运行就可以看到一个圆形的 View.
和效果展示上的这个图差不多,不过这张图多了几个按钮,然后那个圆形 View 有个绿色背景,那个是用来做对比的,在那个 View 之下添加了一个绿色的 View,不要在意这些细节......
对其中使用到的参数和方法做下说明
PathInfo.Builder
PathInfo 创建器,用于配置和生成 PathInfo.
构造方法定义如下
        /**
         * @param generator Path 生成器
         * @param view 实现了 ClipPathLayout 接口的 ViewGroup 的子 View
         */
        public Builder(PathGenerator generator, View view) {

        }
PathGenerator
CirclePathGenerator 是一个 PathGenerator 接口的实现类,用于生成圆形的 Path.
PathGenerator 定义如下
public interface PathGenerator {

    /**
     * @param old 以前使用过的 Path,如果以前为 null,则可能为 null
     * @param view Path 关联的子 View 对象
     * @param width 生成 Path 所限定的范围宽度,一般是子 View 宽度
     * @param height 生成 Path 所限定的范围高度,一般是子 View 高度
     * @return 返回一个 Path 对象,必须为闭合的 Path,将用于裁剪子 View
     *
     * 其中 Path 的范围即 left : 0 , top : 0 , right : width , bottom : height
     */
    Path generatePath(Path old, View view, int width, int height);

}
PathGenerator 是使用的核心,父布局将根据这个来对子 View 进行裁剪来实现不规则图形.
此库内置了 4 种 Path 生成器
- CirclePathGenerator(圆形 Path 生成器)
- OvalPathGenerator(椭圆 Path 生成器)
- RhombusPathGenerator(菱形 Path 生成器)
- OvalRingPathGenerator(椭圆环 Path 生成器)
如果有其他复杂的 Path,可以自己实现 PathGenerator,可以参考示例中的阴阳鱼 Path 的生成.
ApplyFlag
Path 的应用标志,有如下几种
- APPLY_FLAG_DRAW_ONLY(只用于绘制)
- APPLY_FLAG_TOUCH_ONLY(只用于触摸事件)
- APPLY_FLAG_DRAW_AND_TOUCH(绘制和触摸事件一起应用)
默认不设置的话是 APPLY_FLAG_DRAW_AND_TOUCH.
切换效果如下
ClipType
Path 的裁剪模式,有如下两种
- CLIP_TYPE_IN(取 Path 内范围作为不规则图形子 View)
- CLIP_TYPE_OUT(取 Path 外范围作为不规则图形子 View)
默认不设置为 CLIP_TYPE_IN.
切换效果如下

AntiAlias
抗锯齿,true 表示开启,false 关闭,默认关闭.
请慎用此功能,此功能会关闭硬件加速并且会新建图层,在 View 绘制期间还有一个图片生成过程,所以此功能开启会严重降低绘制性能,并且如果频繁刷新界面会导致内存抖动.所以这个功能只建议在静态而且不常刷新的情况下使用.
自定义 ClipPathLayout
自定义一个 ClipPathLayout 很简单,首先选择一个 ViewGroup,然后实现 ClipPathLayout 接口.
然后再在自定义的 ViewGroup 中创建一个 ClipPathLayoutDelegate 对象.
ClipPathLayoutDelegate mClipPathLayoutDelegate = new ClipPathLayoutDelegate(this);
并将所有 ClipPathLayout 接口的实现都委派给 ClipPathLayoutDelegate 去实现.
这里需要注意两点:
- 需要重写 ViewGroup 的 drawChild,按如下实现即可
    @Override
    protected boolean drawChild(Canvas canvas, View child, long drawingTime) {
        beforeDrawChild(canvas, child, drawingTime);
        boolean result = super.drawChild(canvas, child, drawingTime);
        afterDrawChild(canvas, child, drawingTime);
        return result;
    }
- requestLayout 方法也需要重写,这属于 ViewGroup 和 ClipPathLayout 共有的方法,这个方法会在父类的 ViewGroup 的构造方法中调用,在父类构造方法被调用时,mClipPathLayoutDelegate 还没有初始化,如果直接调用会报空指针,所以需要添加空判断.
    @Override
    public void requestLayout() {
        super.requestLayout();
        // the request layout method would be invoked in the constructor of super class
        if (mClipPathLayoutDelegate == null) {
            return;
        }
        mClipPathLayoutDelegate.requestLayout();
    }
这里将整个 ClipPathFrameLayout 源码贴出作为参考
public class ClipPathFrameLayout extends FrameLayout implements ClipPathLayout {

    ClipPathLayoutDelegate mClipPathLayoutDelegate = new ClipPathLayoutDelegate(this);

    public ClipPathFrameLayout(@NonNull Context context) {
        this(context, null);
    }

    public ClipPathFrameLayout(@NonNull Context context, @Nullable AttributeSet attrs) {
        this(context, attrs, 0);
    }

    public ClipPathFrameLayout(@NonNull Context context, @Nullable AttributeSet attrs, int defStyleAttr) {
        super(context, attrs, defStyleAttr);
    }

    @Override
    public boolean isTransformedTouchPointInView(float x, float y, View child, PointF outLocalPoint) {
        return mClipPathLayoutDelegate.isTransformedTouchPointInView(x, y, child, outLocalPoint);
    }

    @Override
    public void applyPathInfo(PathInfo info) {
        mClipPathLayoutDelegate.applyPathInfo(info);
    }

    @Override
    public void cancelPathInfo(View child) {
        mClipPathLayoutDelegate.cancelPathInfo(child);
    }

    @Override
    public void beforeDrawChild(Canvas canvas, View child, long drawingTime) {
        mClipPathLayoutDelegate.beforeDrawChild(canvas, child, drawingTime);
    }

    @Override
    public void afterDrawChild(Canvas canvas, View child, long drawingTime) {
        mClipPathLayoutDelegate.afterDrawChild(canvas, child, drawingTime);
    }

    //the drawChild method is not belong to ClipPathLayout ,
    //but you should rewrite it without changing the return value of the method
    @Override
    protected boolean drawChild(Canvas canvas, View child, long drawingTime) {
        beforeDrawChild(canvas, child, drawingTime);
        boolean result = super.drawChild(canvas, child, drawingTime);
        afterDrawChild(canvas, child, drawingTime);
        return result;
    }

    //do not forget to rewrite the method
    @Override
    public void requestLayout() {
        super.requestLayout();
        // the request layout method would be invoked in the constructor of super class
        if (mClipPathLayoutDelegate == null) {
            return;
        }
        mClipPathLayoutDelegate.requestLayout();
    }

    @Override
    public void notifyPathChanged(View child) {
        mClipPathLayoutDelegate.notifyPathChanged(child);
    }

    @Override
    public void notifyAllPathChanged() {
        mClipPathLayoutDelegate.notifyAllPathChanged();
    }
}
转场动画布局的使用
转场动画布局这里做了两个,一个用于普通的 View(TransitionFrameLayout),一个是针对 Fragment 的容器(TransitionFragmentContainer).
TransitionFrameLayout
这个布局继承于 FrameLayout,用于两个 View 的场景切换.
要求两个子 View 大小宽高需要一致,位置也一致.一般不做什么特殊设置的话,FrameLayout 默认就是如此的.
这个 ViewGroup 限定只显示一个 View,如果在 xml 中添加了多个 View,只有最后一个 View 会显示出来.
如果需要添加一个 View 或者将其中隐藏的 View 显示出来请调用 TransitionFrameLayout 的 switchView 方法,不要直接调用 addView 或者 setVisibility,可能会造成不太友好的界面效果.
使用
以两个 TextView 的切换为例
<com.yxf.clippathlayout.transition.TransitionFrameLayout xmlns:android="http://schemas.android.com/apk/res/android"
    android:layout_width="match_parent"
    android:layout_height="match_parent">

    <TextView
        android:id="@+id/blue_view"
        android:layout_width="match_parent"
        android:layout_height="match_parent"
        android:background="#880000ff"
        android:gravity="center"
        android:text="蓝色界面"
        android:textSize="30sp" />

    <TextView
        android:id="@+id/green_view"
        android:layout_width="match_parent"
        android:layout_height="match_parent"
        android:background="#8800ff00"
        android:gravity="center"
        android:text="绿色界面"
        android:textSize="30sp" />

</com.yxf.clippathlayout.transition.TransitionFrameLayout>
mLayout = (TransitionFrameLayout) inflater.inflate(R.layout.fragment_view_transition, null);
现在绿色界面在上面显示,蓝色隐藏.
如果需要将蓝色界面切换出来,可以调用如下代码.
TransitionAdapter adapter = mLayout.switchView(mBlueView);
switchView 有两个方法
    @Override
    public TransitionAdapter switchView(View view) {
        return switchView(view, false);
    }

    /**
     * if you want add a view , just invoke switchView directly ,
     * do not invoke addView , it may cause some problem .
     *
     * @param view
     * @return
     */
    @Override
    public TransitionAdapter switchView(final View view, boolean reverse) {
        //.................
    }
reverse 为 false 表示动画扩张,为 true 表示收缩.
在 switchView 后获得一个 adapter 对象,此时蓝色界面还没有展示出来.
可以通过 adapter 获得一个 ValueAnimator 对象或者一个 Controller 对象. 可以直接调用
adapter.animate();
来启动场景切换动画效果.
也可以通过
adapter.getAnimator();
获得一个属性动画,自己控制动画过程.
还可以获得一个 Controller 对象
mController = adapter.getController();
然后通过
mController.setProgress
来控制动画的实现进度.当到达 1 时(进度范围 0~1),即动画结束时,调用
adapter.finish();
来通知转场结束了.
直接使用 adapter.animate()的效果如下
![]()
TransitionFragmentContainer
这个布局作为 Fragment 的容器来实现 Fragment 的场景切换效果.
直接像 FrameLayout 作为 Fragment 容器做动态添加删除即可.
效果如下
![]()
TransitionAdapter
这个类是一个 Path 适配器,构造方法如下
public TransitionAdapter(PathGenerator generator)
适配器需要获得一个 Path 内所能容下的最大矩形区域来确定一个最小的放大 Scale,以获得最好的视觉效果, 当前采用了一种二分查找的方式去获得这个矩形区域,不过这种方式有个弊端,对于中心有镂空的 Path, 这种方式是不可行的,所以针对这种情况,添加了一个 TransitionPathGenerator 的接口,定义如下
public interface TransitionPathGenerator extends PathGenerator {

    /**
     * @param similar 相似矩形参考
     * @param boundWidth Path 的范围区域宽
     * @param boundHeight Path 的范围区域高
     * @return 返回最大的和@param similar 相似的的矩形区域,
     * 返回的矩形区域中心必须是 Path 的中心,即(boundWidth/2,boundHeight/2),
     * 为了尽量减少内存抖动,建议使用参数传入的矩形修改数值后返回
     */
    Rect maxContainSimilarRange(Rect similar, int boundWidth, int boundHeight);

}
如果有比较特殊的 Path(比如有镂空)需要自定义包含的矩形区域范围,可以实现这个接口,然后作为 TransitionAdapter 的构造参数传入.
回到 TransitionAdapter 上
以上两种转场动画容器都有 setAdapter 方法,可以替换掉默认的 TransitionAdapter.
从 TransitionFrameLayout.switchView 中获得 Adapter 后,还可以通过 setPathCenter 来控制 Path 的扩张和收缩中心,默认 PathCenter 是 View 中心.
