HappyBubble
Introduction: :thought_balloon:BubbleLayout 随意变化的气泡布局、消息对话框,可定制颜色,背景、弧度、尖角弧度、边框等等。BubbleDialog 气泡弹窗根据点击 View 的位置定位它的弹窗位置,BubbleDialog 可定制方向等!(BubbleLayout changes freely,BubbleDialog click on the location of View positioning its location,BubbleDialog can be customized directions.)
Tags:
![]()
![]()

气泡布局的形状可以改变,如四角弧度、气泡颜色、箭头大小和阴影。
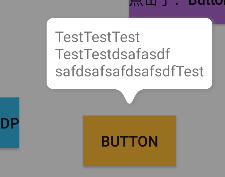
气泡 Dialog 可以根据被点击的 view 的位置来确定自己展示的位置。
更新
| 版本 | 更新描述 | 图片 |
|---|---|---|
| 1.2.6 | 修复列表位置偏移#43 | |
| 1.2.5 | 修复位置偏移#36 | |
| 1.2.4 | 修复状态栏高度获取#31 | |
| 1.2.3 | 修复气泡内边距问题 | |
| 1.2.2 | 新特性“设置气泡边框和边框颜色”#23 |  |
| 1.2.1 | 新特性“设置气泡背景”#25 | 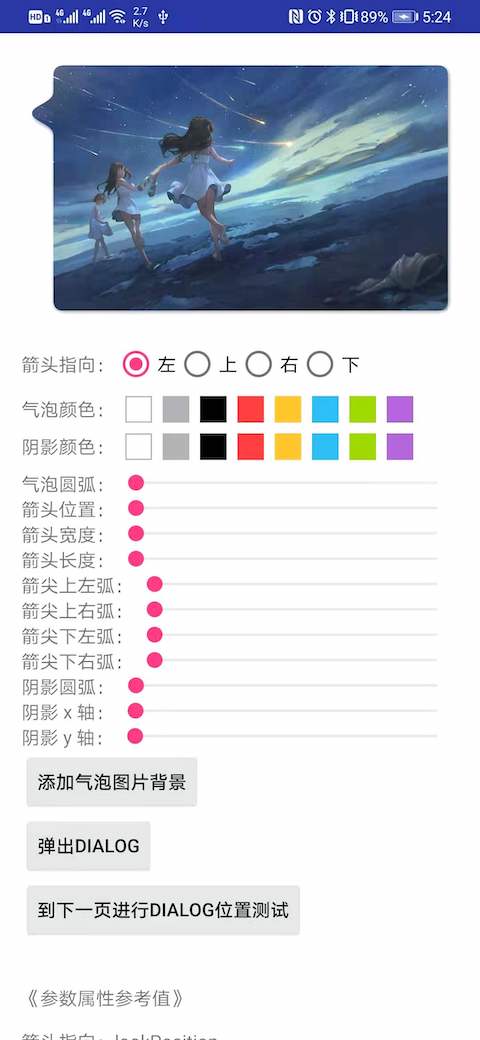 |
| 1.2.0 | 箭头的上下圆弧都可以自由定制 | |
| 1.1.9 | 修复初始位置偏移;新增通过 x,y 坐标显示 HappyDialog | |
| 1.1.8 | 修复当设置透明背景时,状态栏文字颜色可能变白色问题 | |
| 1.1.7 | 修复位置问题,修复autoPosition无效问题,修复横屏模式问题。#13#11#10 |
|
| 1.1.6 | 新增方向优先级:#9 | |
| 1.1.5 | 修复:#8 | |
| 1.1.4 | ①新增方法setLayout(int width, int height, int margin),width(设置气泡的宽)、height(设置气泡的高)、margin(设置距离屏幕边缘的间距,只有当设置 width 或 height 为 MATCH_PARENT 才有效)。② autoPosition(true)方法准备弃用(现在还可以用),使用新方法autoPosition(Auto),如果两个都使用了会直接用autoPosition(Auto)。请参考下方“方法参考表”。③感谢@wolf8088521提供建议#4 |
|
| 1.1.3 | ①通过重新调用 setClickedView 可以直接更新当前 dialog 的所在位置。 ②新添加 setRelativeOffset(int)方法,设置 dialog 相对与被点击 View 的偏移(负值:向被点击 view 的中心偏移;正值:向被点击 view 的外侧偏移) ③测试页面 SetClickedViewTestActivity.java |
 |
| 1.1.2 | 修复默认值没有适配屏幕 | |
| 1.1.1 | 修复大小变化后,没有对应变化位置的问题;修复接触顶部偏位问题; | |
| 1.1.0 | ①Dialog 交互事件传递到 Activity 达到不在不关闭 Dialog 的情况下做其他 Activity 的操作。 ②添加自动根据被点击 View 距离屏幕边缘的距离确定 Dialog 的位置。 ③新增“autoPosition”和“setThroughEvent”方法,请参考“BubbleDialog 方法参考表” |
③ |
| 1.0.3 | 继续优化了点击在气泡之外才会被 dismiss;修复了 Dialog 周围会有部分点击无法 dismiss; | |
| 1.0.2 | 修复点击 dialog 边缘无法取消 |
哪些 app 使用了它?
| 玩清单 |
|---|
如何开始?
在你模块中的 build.gradle 添加上 HappyBubble 依赖
repositories {
  mavenCentral()
}

dependencies {
  implementation 'com.github.xujiaji:happy-bubble:1.2.6'
}
如何使用 HappyBubble-BubbleDialog?
方法参考表(不全面) 具体详细参数请参照案例代码和attrs.xml
| 方法名 | 参数 | 描述 |
|---|---|---|
| addContentView | View | 添加填充在气泡中的视图 |
| setClickedView | View | 被点击的 View(触发 Dialog 出现的 View) |
| setPosition | enum ... BubbleDialog.Position:LEFTTOPRIGHTBOTTOM |
BubbleDialog 相对于被点击的 view 的位置。如果传入多个位置,那么最前面的位置优先级越高 |
| setOffsetX | int | 如果您对 dialog 所展示的 x 轴位置不满,需要调整 x 轴方向偏移 |
| setOffsetY | int | 如果您对 dialog 所展示的 y 轴位置不满,需要调整 y 轴方向偏移 |
| setBubbleLayout | BubbleLayout | 自定义 dialog 的气泡布局 |
| setTransParentBackground | - | 背景透明 |
| softShowUp | - | 当气泡 dialog 中有 EditText 时,软键盘弹出会遮挡 EditText 时,dialog 随软键盘上移。 |
| show | - | 显示 |
| autoPosition | enum Auto:AROUNDUP_AND_DOWNLEFT_AND_RIGHT |
自动确定位置功能,显示在被点击 View 距离屏幕边缘的最大空间。开启后,“setPosition”功能失效。 AROUND:被点击 View 四周; UP_AND_DOWN:被点击 View 上下显示; LEFT_AND_RIGHT:被点击 View 左右显示; |
| setThroughEvent | boolean, boolean | 第一个参数 isThroughEvent 设置是否穿透 Dialog 手势交互。 第二个参数 cancelable 点击空白是否能取消 Dialog,只有当"isThroughEvent=false"时才有效 |
| setRelativeOffset | int | 设置 dialog 相对与被点击 View 的偏移(负值:向被点击 view 的中心偏移;正值:向被点击 view 的外侧偏移),设置后会直接影响 setOffsetX 和 setOffsetY 方法。 |
| setLayout | int,int,int | 设置气泡的宽高和距离屏幕边缘的距离 第一个参数:width(设置气泡的宽); 第二个参数:height(设置气泡的高); 第三个参数:margin(设置距离屏幕边缘的间距,只有当设置 width 或 height 为 MATCH_PARENT 才有效)。 宽高单位为 px 或 MATCH_PARENT |
最简单的实现
 |
 |
new BubbleDialog(this)
        .addContentView(LayoutInflater.from(this).inflate(R.layout.dialog_view3, null))
        .setClickedView(mButton)
        .show();
向下偏移 8dp

new BubbleDialog(this)
        .addContentView(LayoutInflater.from(this).inflate(R.layout.dialog_view3, null))
        .setClickedView(mButton4)
        .setPosition(mPosition)
        .setOffsetY(8)
        .show();
当想要输入框随软键盘上移时
new BubbleDialog(this)
        .addContentView(LayoutInflater.from(this).inflate(R.layout.dialog_view, null))
        .setClickedView(mButton12)
        .setPosition(mPosition)
        .softShowUp()
        .show();
自定义 BubbleLayout
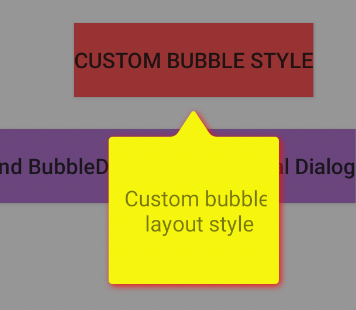
BubbleLayout bl = new BubbleLayout(this);
bl.setBubbleColor(Color.YELLOW);
bl.setShadowColor(Color.RED);
bl.setLookLength(Util.dpToPx(this, 18));
bl.setLookWidth(Util.dpToPx(this, 24));
bl.setBubbleRadius(Util.dpToPx(this, 3));
new BubbleDialog(this)
        .addContentView(LayoutInflater.from(this).inflate(R.layout.dialog_view5, null))
        .setClickedView(mButton8)
        .setPosition(mPosition)
        .setBubbleLayout(bl)
        .show();
自定义 BubbleDialog,可交互的 BubbleDialog
1、布局
<?xml version="1.0" encoding="utf-8"?>
<LinearLayout xmlns:android="http://schemas.android.com/apk/res/android"
    android:layout_width="160dp"
    android:layout_height="match_parent"
    android:orientation="vertical">

    <Button
        android:id="@+id/button13"
        android:layout_width="match_parent"
        android:layout_height="wrap_content"
        android:text="Button1" />

    <Button
        android:id="@+id/button14"
        android:layout_width="match_parent"
        android:layout_height="wrap_content"
        android:text="Button2" />

    <Button
        android:id="@+id/button15"
        android:layout_width="match_parent"
        android:layout_height="wrap_content"
        android:text="Button3" />

</LinearLayout>
2、自定义 BubbleDialog
/**
 * 自定义可操作性 dialog
 * Created by JiajiXu on 17-12-11. */

public class CustomOperateDialog extends BubbleDialog implements View.OnClickListener
{
    private ViewHolder mViewHolder;
    private OnClickCustomButtonListener mListener;

    public CustomOperateDialog(Context context)
    {
        super(context);
        setTransParentBackground();
        setPosition(Position.TOP);
        View rootView = LayoutInflater.from(context).inflate(R.layout.dialog_view4, null);
        mViewHolder = new ViewHolder(rootView);
        addContentView(rootView);
        mViewHolder.btn13.setOnClickListener(this);
        mViewHolder.btn14.setOnClickListener(this);
        mViewHolder.btn15.setOnClickListener(this);
    }

    @Override
    public void onClick(View v)
    {
        if (mListener != null)
        {
            mListener.onClick(((Button)v).getText().toString());
        }
    }

    private static class ViewHolder
    {
        Button btn13, btn14, btn15;
        public ViewHolder(View rootView)
        {
            btn13 = rootView.findViewById(R.id.button13);
            btn14 = rootView.findViewById(R.id.button14);
            btn15 = rootView.findViewById(R.id.button15);
        }
    }

    public void setClickListener(OnClickCustomButtonListener l)
    {
        this.mListener = l;
    }

    public interface OnClickCustomButtonListener
    {
        void onClick(String str);
    }
}
3、显示
CustomOperateDialog codDialog = new CustomOperateDialog(this)
        .setPosition(mPosition)
        .setClickedView(mButton10);
codDialog.setClickListener(new CustomOperateDialog.OnClickCustomButtonListener()
{
    @Override
    public void onClick(String str)
    {
        mButton10.setText("点击了:" + str);
    }
});
codDialog.show();
查看关于 BappyDialog 的使用代码
写法建议
根据@hm该朋友在文章中反馈的多次点击后位置不对的问题,是由于多次对 BappyDialog 进行了设置导致,所以建议下方写法。(当然如果对重复调用 setClickedView()方法设置不同的被点击的控件来更新位置有需要,是需要写在外面的。)
if(mBubbleDialog == null)
{
    mBubbleDialog = new BubbleDialog(this)
        .addContentView(LayoutInflater.from(this).inflate(R.layout.dialog_view3, null))
        .setClickedView(mButton4)
        .setPosition(mPosition)
        .setOffsetY(8);
}
mBubbleDialog.show();
如何使用 HappyBubble-BubbleLayout?
在 XML 代码中设置属性值
属性参照表
| 属性 | 值 | 描述 |
|---|---|---|
| lookAt | left, top, right, bottom | 箭头指向 |
| lookLength | dimension | 箭头的长度 |
| lookPosition | dimension | 箭头相对于 x 或 y 轴的位置 |
| lookWidth | dimension | 箭头的宽度 |
| bubbleColor | color | 气泡的颜色 |
| bubbleRadius | dimension | 气泡四角的圆弧 |
| bubblePadding | dimension | 气泡边缘到 BubbleLayout 边缘的距离 |
| shadowRadius | dimension | 阴影的扩散大小 |
| shadowX | dimension | 阴影在 x 轴方向的偏移 |
| shadowY | dimension | 阴影在 y 轴方向的偏移 |
| shadowColor | color | 阴影的颜色 |
xml 例子
    <com.xujiaji.happybubble.BubbleLayout
        xmlns:app="http://schemas.android.com/apk/res-auto"
        android:id="@+id/bubbleLayout"
        android:layout_width="match_parent"
        android:layout_height="200dp"
        android:layout_margin="16dp"
        app:lookAt="left"
        app:lookLength="16dp"
        app:lookPosition="20dp"
        app:lookWidth="16dp" />
在 java 代码中定义属性值
BubbleLayout 通过“set 属性名”方法和 invalidate 方法来更新 BubbleLayout。
mBubbleLayout.setLook(BubbleLayout.Look.LEFT);
查看更多

demo 下载
![]()
License
   Copyright 2016 XuJiaji

   Licensed under the Apache License, Version 2.0 (the "License");
   you may not use this file except in compliance with the License.
   You may obtain a copy of the License at

       http://www.apache.org/licenses/LICENSE-2.0

   Unless required by applicable law or agreed to in writing, software
   distributed under the License is distributed on an "AS IS" BASIS,
   WITHOUT WARRANTIES OR CONDITIONS OF ANY KIND, either express or implied.
   See the License for the specific language governing permissions and
   limitations under the License.
