kopycat
Description
Kopycat is an emulator for hardware platforms, designed to create virtual replicas of physical devices with various architectures.
Main features are:
- Easy to assemble a new device. Configure your own platform using Kotlin.
- Easy to customize. Create your own platform-module using Kotlin.
- Cross-platform. Kopycat uses JVM as a backend and can be run on Windows, Linux and OSX.
- One-to-one correspondence. Virtual platform representation is identical to the diagram of emulating device.
- Multiple supported architectures: MIPS, ARM, MSP430, v850ES, x86_64.
- User-level mode. Can emulate a standalone ELF-file without full system emulation.
This project contains:
CPU cores: ARMv6, ARMv6M, ARMv7, MIPS, MSP430, v850ES, x86_64, PowerPC (E500v2)
MCUs: Cortex-M0, STM32F0xx, MSP430x44x, PIC32MZ, P2020, Atom 2758, ElanSC520
Origin
The project originated from the task of emulating a device with an uncommon processor architecture.
Existing platforms for emulating hardware devices (like QEMU) did not support this architecture.
There were two ways to solve the problem:
- Modifying existing software.
- Building our own solution.
We decided to go with the second option.
Besides emulating the target architecture, the Kopycat project had other goals to make emulating specific devices easier, such as:
- Easy development: To make it simple to add new architectures and modules, we chose Kotlin as the programming language because it has many helpful syntax features.
- Advanced interaction tools: Kopycat includes tools for flexible interaction with the emulation process. For example, it has "tracers" that describe the logic executed for each assembly instruction of the device. With these, you can, for example, build a call stack for a program without its source code or even change how the emulator works.
- Integration with other tools: To allow Kopycat to work with other software, we added remote procedure call (RPC) and REST API protocols.
Of course, using the JVM together with tracers and other extra emulator features affects its speed. That’s why another important feature is creating "snapshots"—saved states that let you restart the emulator from a specific point.
Architecture
Kopycat has a modular architecture, which makes it quick to create an emulator for any hardware platform.
The modules form a hierarchy of components, where the emulated device is called the top module.
The modules interact with each other using a bus architecture. Buses, in turn, connect to modules through ports.
Here’s an example of a simple architecture:
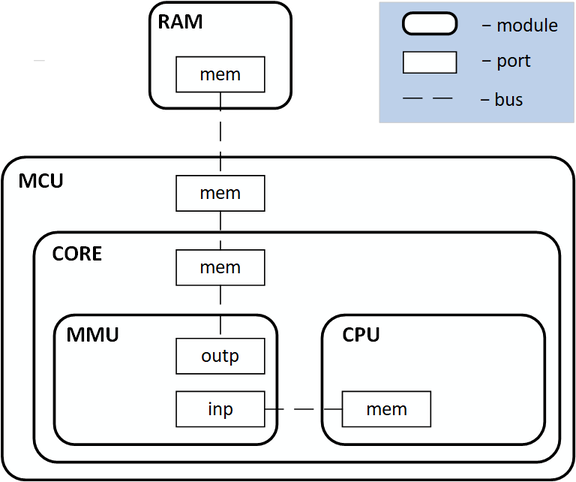
This approach lets you describe a device’s architecture in a way that matches its physical block diagram during development.
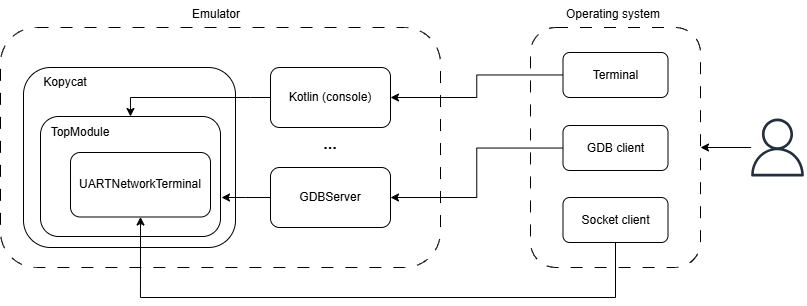
The top module is initialized in an instance of the Kopycat class. A Kotlin console is provided to manage the emulator.
Protocols like GDB, REST, and RPC are also available. To allow connections to the emulated device’s system, the
UartNetworkTerminal class is used. Overall, the virtual device and its interaction with the main operating system
can be shown in this diagram:
User Guide
Here you can find a guide on how to launch and get started with the Kopycat emulator from scratch.
Fast overview:
- The first step is to obtain a Linux distribution that will be loaded into the emulator. This section describes how to build the distribution using the Buildroot utility.
- Next, the deployment process of the emulator is explained so you can begin to work with it.
- Finally, after the emulator has been launched, we cover how to work with networking (E1000) and disk (SATA) devices. The section helps expand your usage of Kopycat, especially for working with networking and disk.
NOTE: The guide implies, that you have already cloned Kopycat project on your device. If not:
git clone https://github.com/inforion/kopycat.git
Screenshots
Kotlin-console:

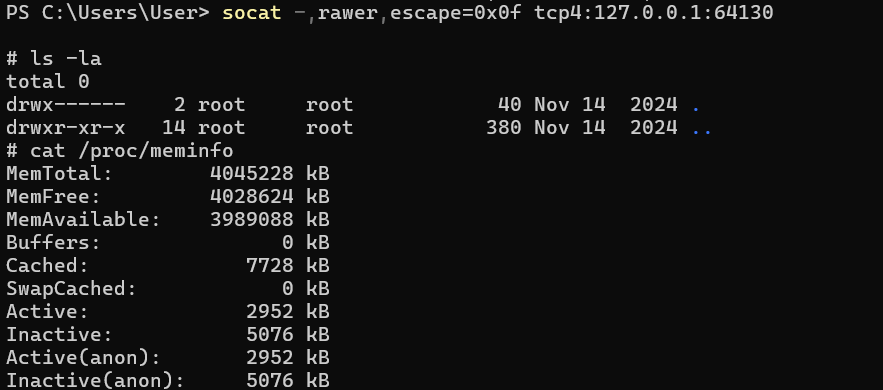
Socat terminal:
Message about GDB connection established in the console:

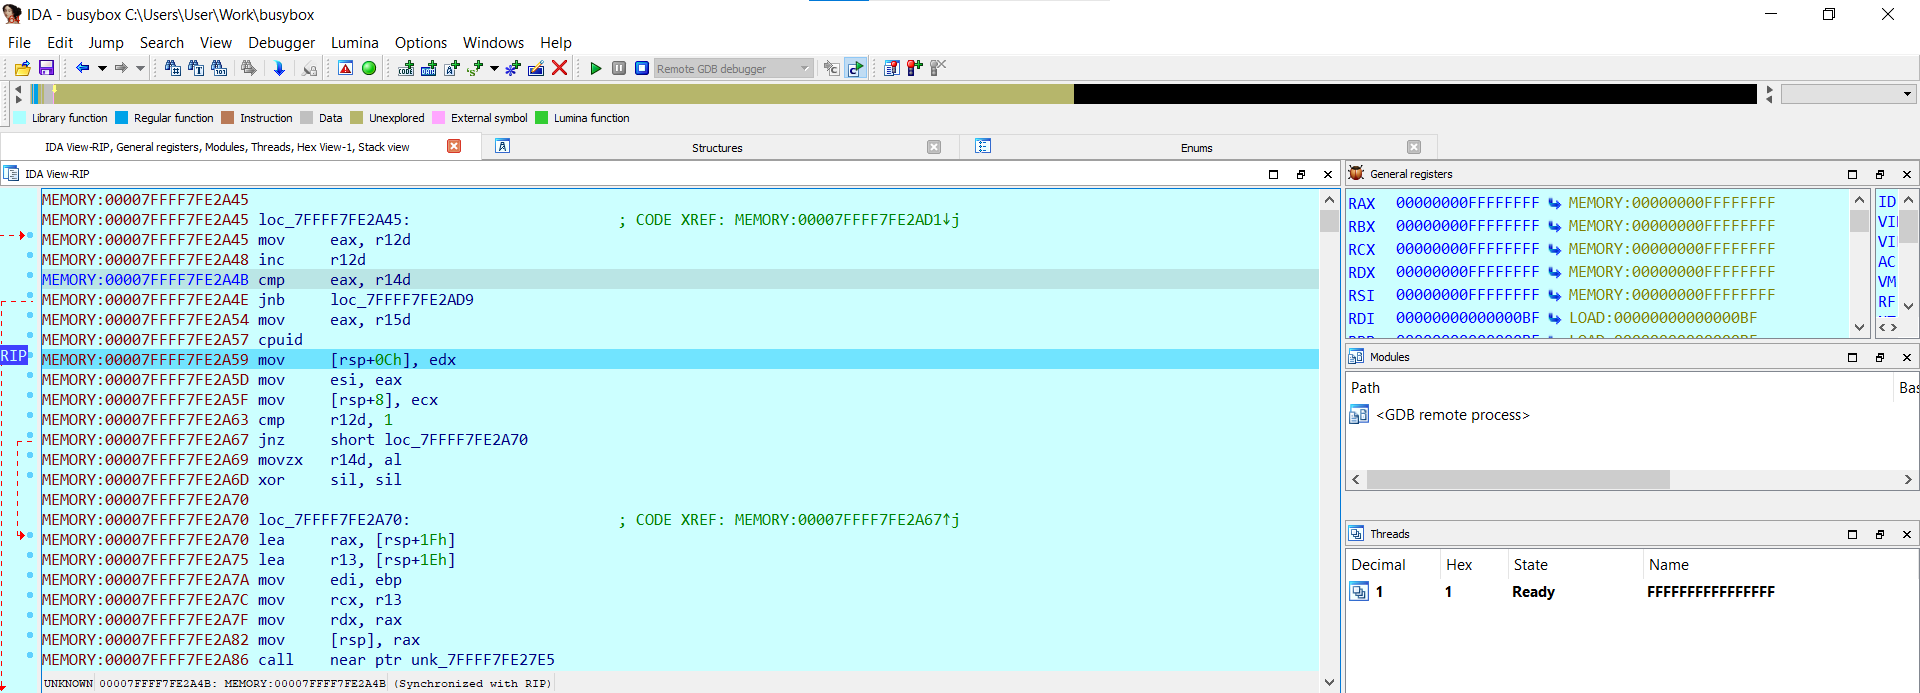
Debug with IDA:
Prerequisites
To use Kopycat, ensure you have the following installed:
- Java Development Kit (JDK) 11
- Socat: For terminal interaction
- Git
- Docker or Podman (optional)
1. Preparing the Distribution using Buildroot
Buildroot is a tool that simplifies and automates the process of building a complete Linux system for embedded devices using cross-compilation.
You can configure the toolchain and kernel via make menuconfig and make linux-menuconfig, which provide a text-based user interface. The full build is triggered with make.
After configuration and build, the artifacts will be located in the ./output/images directory.
For more information, refer to the official documentation — Buildroot - Making Embedded Linux Easy
Building the Kernel for kopycat x86 (Version 0.11.0+)
Inside the ./kopycat-modules/tops/demolinux/src/main/buildroot directory, you'll find a Containerfile to build an image using Buildroot with a preconfigured Linux kernel for x86. You can use either Docker or Podman (commands are similar).
Change into the correct directory:
cd ./kopycat-modules/tops/demolinux/src/main/buildrootBuild the image:
docker build -f ./Containerfile -t my-buildroot .Once the image is built, extract the kernel and root.cpio:
docker create --name temp-container my-buildroot
docker cp temp-container:/build/buildroot/output/images ./images
docker rm temp-container
The kernel and root filesystem will be placed in ./kopycat-modules/tops/demolinux/src/main/buildroot/images
To build a kernel for MIPS, use the same steps inside ./kopycat-modules/tops/demolinux_mips/src/main/buildroot
Building the Kernel for kopycat x86 (Version 0.10.0)
Inside the ./kopycat-modules/tops/demolinux/src/main/buildroot directory, you'll find a Buildroot archive (buildroot-2023.11.1.tar.gz) and shell scripts for configuration and building.
- Unpack the Buildroot archive:
tar xf buildroot-2023.11.1.tar.gz
mv buildroot-2023.11.1 buildroot-unpacked
- Run the build script:
./Build.sh - The kernel image and filesystem will be in
./kopycat-modules/tops/demolinux/src/main/buildroot/buildroot-unpacked/output/images/
NOTE: On Windows, you can use WSL or Docker as a virtual environment for script execution and kernel building.
2. Launching Kopycat
2.1 Guide for Linux
Steps to Launch and Check the Demolinux Top Module with Kopycat:
Check Java version
Ensure you're using Java 11:java --versionIf multiple JDK versions are installed, set the
PATHandJAVA_HOMEenvironment variables to point to JDK 11.Build kotlin-extensions
git clone https://github.com/inforion/kotlin-extensions.git
cd kotlin-extensions
./gradlew publishToMavenLocal
Open the project and build Kopycat
./gradlew createKopycatConfig
./gradlew buildKopycatModule
Install socat
sudo apt install socatRun the script to launch Kopycat
Before launching the emulator, make sure that you have all necessary resources (kernel and rootfs for demolinux). These files should be located either in:
./kopycat-modules/**/src/main/resources/**/binaries(used to embed the kernel in the JAR during project build);./kopycat/resources/**/binaries(used to load the kernel at runtime).
If you don't have those resources, you can find an instruction how to get them in the first part of this user guide. Don't forget to move them to the one of mentioned resource directories
Run the script to launch Kopycat:
./kopycat/temp/config/bash/demolinux-default.shNOTE: Also, note that in demolinux_x86, for example, Kopycat looks for the kernel and rootfs as "bzImage.gz" and "rootfs.cpio.gz". If you want to override the default resource names (e.g., to use uncompressed files), you can specify them in the top module parameters in the program launch command
-p "...,bzImageName=bzImage,initRdName=rootfs.cpio"NOTE: Runtime kernel has more priority.
Start Kopycat
In the Kopycat console, run:kc.start()if you have a snapshot, where the system is fully booted and ready, you can load it to avoid waiting:
kc.load("snapshot_name.zip")NOTE: Snapshots allow you to save device's state and load it whenever you want to get this state. To create a snapshot use
kc.save("snapshot_name")command. Snapshots are located in the./temp/demolinuxdirectory by default (in demolinux). When you want to load snapshot, it also must be located in this directory.NOTE: Snapshot directory is defined in the launch command using the "-w" option.
Connect via socat
socat -,rawer,escape=0x0f tcp4:localhost:64130Verify Demolinux operation
Once the system has booted and the console is accessible, enter the following commands and wait for the output:ls -l cat /proc/meminfo
2.2 Guide for Windows
Launching emulator in Windows is pretty much the same. The main differences is using powershell instead of bash and how to get socat.
Steps to Launch and Check the Demolinux Top Module with Kopycat:
Check Java version
Make sure Java 11 is used:java --versionIf multiple JDK versions are installed, configure
PATHandJAVA_HOMEto point to JDK 11.Build kotlin-extensions
git clone https://github.com/inforion/kotlin-extensions.git cd kotlin-extensions ./gradlew publishToMavenLocalOpen the project and build Kopycat
./gradlew createKopycatConfig ./gradlew buildKopycatModuleInstall socat
There are different ways how you can get socat on Windows. For example, you can use msys64:
pacman -S socatAnd then add it to the PATH, so you can use socat from powershell.
Run the PowerShell script to launch Kopycat
Before launching the emulator, make sure that you have all necessary resources (kernel and rootfs for demolinux). These files should be located either in:
./kopycat-modules/**/src/main/resources/**/binaries(used to embed the kernel in the JAR during project build);./kopycat/resources/**/binaries(used to load the kernel at runtime).
If you don't have those resources, you can find an instruction how to get them in the first part of this user guide. Don't forget to move them to the one of mentioned resource directories
.\kopycat\temp\config\powershell\demolinux-default.ps1NOTE: Also, note that in demolinux_x86, for example, Kopycat looks for the kernel and rootfs as "bzImage.gz" and "rootfs.cpio.gz". If you want to override the default resource names (e.g., to use uncompressed files), you can specify them in the top module parameters in the program launch command
-p "...,bzImageName=bzImage,initRdName=rootfs.cpio"NOTE: Runtime kernel has more priority.
Start Kopycat
In the Kopycat console, run:kc.start()if you have a snapshot, where the system is fully booted and ready, you can load it to avoid waiting:
kc.load("snapshot_name.zip")NOTE: Snapshots allow you to save device's state and load it whenever you want to get this state. To create a snapshot use
kc.save("snapshot_name")command. Snapshots are located in the./temp/demolinuxdirectory by default (in demolinux). When you want to load snapshot, it also must be located in this directory.NOTE: Snapshot directory is defined in the launch command using the "-w" option.
Connect via socat
socat -,rawer,escape=0x0f tcp4:localhost:64130NOTE: We are using socat with rawer mode to disable echo and to pass control characters to the guest. if for some reason you can't use socat with rawer mode, try
socat pty,raw,echo=0,iexten=0,isig=0,ixon=0,icanon=0,min=1,time=0,escape=0x0f tcp4:localhost:64130Verify Demolinux operation
Once the system has booted and the console is accessible, enter the following commands and wait for the output:ls -l cat /proc/meminfo
2.3 Launching Kopycat in a Docker container
You can launch Kopycat with docker using Dockerfile in Kopycat repository
Make sure you have installed Docker app
docker --versionBuild docker image
Dockerfile is located in kopycat project directory.
docker build -t kopycat .Run docker container
To run the container:
docker run -it --name kopycat-container kopycat /bin/bashThe workdir of the container will have this content:
opt/kopycat ├── demolinux-default-net.sh ├── demolinux-default-x32.sh ├── demolinux-default.sh ├── kopycat-modules // runtime scripts └── production // JARsIf you want to use custom kernel or snapshots, you can use volumes:
docker run \ -v ./temp:/opt/kopycat/temp/demolinux \ -v ./pathToTheResourceDir:/opt/kopycat/resources/ru/inforion/lab403/kopycat/modules/demolinux/binaries \ -it --name kopycat-container kopycat /bin/bashFirst volume contains snapshots to work with. Second is a directory with kernel, rootfs etc. Also, you can use
docker cpcommand instead of volumes.Run the script in the container
./demolinux-default.shStart Kopycat
In the Kopycat console, run:
kc.start()if you have a snapshot, where the system is fully booted and ready, you can load it to avoid waiting:
kc.load("snapshot_name.zip")NOTE: Snapshots allow you to save device's state and load it whenever you want to get this state. To create a snapshot use
kc.save("snapshot_name")command. Snapshots are located in the./temp/demolinuxdirectory by default (in demolinux). When you want to load snapshot, it also must be located in this directory.NOTE: Snapshot directory is defined in the launch command using the "-w" option.
Connect via socat in Docker container
docker exec -it kopycat-container bash socat -,rawer,escape=0x0f tcp:localhost:64130NOTE: We are using socat with rawer mode to disable echo and to pass control characters to the guest. if for some reason you can't use socat with rawer mode, try
socat pty,raw,echo=0,iexten=0,isig=0,ixon=0,icanon=0,min=1,time=0,escape=0x0f tcp4:localhost:64130Verify Demolinux operation
Once the system has booted and the console is accessible, enter the following commands and wait for the output:
ls -l
cat /proc/meminfo
3. Verifying Network (E1000) and Disk (SATA) in the Emulator (demolinux x86)
3.1 Disk
Create a disk in the project root:
fallocate -l 30M disks/demo.bin
NOTE: Fallocate may not work if you are trying to use it, for example, on the host file system in WSL. In this case, create a file in the /tmp or /opt directory and then move it to the disks directory in the root of kopycat.
You can verify that the emulator detects it:
$ fdisk -l
Output:
Disk /dev/sda: 0 MB, 65536 bytes, 128 sectors
Disk /dev/sda doesn't contain a valid partition table

Disk /dev/sdb: 30 MB, 31457280 bytes, 61440 sectors  # ← Our disk
Disk /dev/sdb doesn't contain a valid partition table
Next, create a partition table and a single ext4 partition. It's more convenient to do this on the host (or in WSL on Windows).
NOTE: It is recommended to turn off an emulator while you are creating a partition table on the host.
Let's attach file as the device:
$ sudo losetup -fP --show ./demo.bin
You should get the name of the device. For example, /dev/loop0
Create the partition table:
$ sudo fdisk /dev/loop0
Sequence of commands to input in the fdisk's cli:
o    → clear old partition table
n    → new partition
p    → primary
1    → partition number
<Enter> for first and last sector (full disk)
w    → write and exit
Format the partition:
$ sudo mkfs.ext4 /dev/loop0p1 -L GUESTDISK
Output:
mke2fs 1.46.5 (30-Dec-2021)
Creating filesystem with 7672 4k blocks and 7680 inodes

Allocating group tables: done
Writing inode tables: done
Creating journal (1024 blocks): done
Writing superblocks and filesystem accounting information: done
Detach device:
$ sudo losetup -d /dev/loop0
Now that the disk has a formatted partition, you can mount and test it in the emulator:
$ partprobe /dev/sdb
 sdb: sdb1

$ mkdir data
$ mount /dev/sdb1 data
EXT4-fs (sdb1): mounted filesystem with ordered data mode. Opts: (null)

$ cd data
$ echo test test test > testfile
$ cd ..
$ umount data && sync
To verify the contents from the host (or WSL):
$ sudo losetup --find --show --partscan ./demo.bin
/dev/loop0

$ sudo mkdir /mnt/testdisk
$ sudo mount /dev/loop0p1 /mnt/testdisk
$ ls /mnt/testdisk
lost+found  testfile

$ cat /mnt/testdisk/testfile
test test test
You should see the file testfile with content: test test test.
3.2 Network
To test networking, bring up a virtual TAP interface on the host with the port specified in the emulator launch parameters.
NOTE: Make sure all these steps are completed before launching the emulator.
sudo socat tun:192.168.19.2/24,tun-type=tap,iff-up,iff-no-pi tcp-listen:30003
On Windows, this can be done using socat in WSL. The command itself is the same, but we need to do port forwarding in Windows.
Get wsl IP-address in the host's network (Powershell):
PS wsl hostname -I
172.27.181.15 192.168.19.2
Use received address to port forwarding (Powershell):
PS netsh interface portproxy add v4tov4 `
>>   listenaddress=0.0.0.0 listenport=30003 `
>>   connectaddress=172.27.181.15 connectport=30003

PS New-NetFirewallRule -DisplayName "WSL PortProxy 30003" `
>>   -Direction Inbound -Protocol TCP -LocalPort 30003 -Action Allow
To test network functionality, start a simple Python server in the same directory with a test file:
python3 -m http.server
Finally, we can test network in the emulator.
Note: Some commands require waiting to execute.
Let's set up a network interface in the emulator:
$ ip link set eth0 up
Output:
IPv6: ADDRCONF(NETDEV_UP): eth0: link is not ready
e1000e: eth0 NIC Link is Up 1000 Mbps Full Duplex, Flow Control: Rx/Tx
IPv6: ADDRCONF(NETDEV_CHANGE): eth0: link becomes ready
Assign an IP-address:
$ ip addr add 192.168.19.10/24 dev eth0
Try to download test file from the host:
$ wget http://192.168.19.2:8000/test
Output:
Connecting to 192.168.19.2:8000 (192.168.19.2:8000)
saving to 'test'
test                 100% |********************************|    10  0:00:00 ETA
'test' saved
Make sure, that content of the downloaded file matches with a content of this file on the host:
$ cat test
Output:
test file
3.3 Global network
if you want to connect to global network, you will have to take a few additional steps.
We are going to configure NAT between our TAP interface we have created in previous part and interface we are using to connect to global network on the host (WSL for windows).
First of all we need to enable ip forwarding:
sudo sysctl -w net.ipv4.ip_forward=1
Next step we have to configure NAT with iptables:
sudo iptables -t nat -A POSTROUTING -s 192.168.19.0/24 -o eth0 -j MASQUERADE
sudo iptables -A FORWARD -i tap0 -o eth0 -j ACCEPT
sudo iptables -A FORWARD -i eth0 -o tap0 -m state --state RELATED,ESTABLISHED -j ACCEPT
eth0 is an interface to get access to the global network. You can define your interface with ip addr show
Now we need to set default gateway in emulator:
$ ip route show
192.168.19.0/24 dev eth0 scope link  src 192.168.19.10

$ ip route add default via 192.168.19.2 dev eth0
$ ip route show
default via 192.168.19.2 dev eth0
192.168.19.0/24 dev eth0 scope link  src 192.168.19.10
Finally, lets try to ping 8.8.8.8 (Google public DNC):
$ ping 8.8.8.8
Output:
PING 8.8.8.8 (8.8.8.8): 56 data bytes
64 bytes from 8.8.8.8: seq=0 ttl=100 time=4.000 ms
64 bytes from 8.8.8.8: seq=1 ttl=100 time=0.000 ms
64 bytes from 8.8.8.8: seq=2 ttl=100 time=0.000 ms
64 bytes from 8.8.8.8: seq=3 ttl=100 time=0.000 ms
64 bytes from 8.8.8.8: seq=4 ttl=100 time=0.000 ms
64 bytes from 8.8.8.8: seq=5 ttl=100 time=0.000 ms
64 bytes from 8.8.8.8: seq=6 ttl=100 time=0.000 ms
64 bytes from 8.8.8.8: seq=7 ttl=100 time=0.000 ms
64 bytes from 8.8.8.8: seq=8 ttl=100 time=0.000 ms
64 bytes from 8.8.8.8: seq=9 ttl=100 time=0.000 ms
^C
--- 8.8.8.8 ping statistics ---
10 packets transmitted, 10 packets received, 0% packet loss
round-trip min/avg/max = 0.000/0.400/4.000 ms
