cim

![]()
![]()
![]()
📘Introduction |📽Video Demo | 🏖TODO LIST | 🌈Architecture |💡Flow Chart|🌁Quick Start|👨🏻✈️Built-in Commands|🎤Chat|❓QA|💌Contact
- Upgrade to JDK17 & springboot3.0
- Client SDK
- Client use picocli instead of springboot.
- Support integration testing.
- Integrate OpenTelemetry .
- Support single node startup(Contains no components).
- Third-party components support replacement(Redis/Zookeeper, etc.).
- Support web client(websocket).
- Support docker container.
- Support kubernetes operation.
- Supports binary client(build with golang).
Introduction
CIM(CROSS-IM) is an IM (instant messaging) system for developers; it also provides some components to help developers build their own scalable IM.
Using CIM, you can achieve the following requirements:
IMinstant messaging system.- Message push middleware for
APP. - Message middleware for
IOTmassive connection scenarios.
If you have any questions during use or development, you can contact the author.
Video Demo
Click the links below to watch the video demo.
| YouTube | Bilibili |
|---|---|
| Group Chat Private Chat | Group Chat Private Chat |
 |
 |
TODO LIST
- Group Chat
- Private Chat
- Built-in Commands
- Chat History Query
- AI Mode
- Efficient encoding/decoding with
Google Protocol Buffer - Flexible horizontal scaling based on actual needs
- Server-side automatic removal of offline clients
- Client automatic reconnection
- Delayed Messages
- SDK development package
- Group categorization
- Offline messages
- Message encryption
Architecture

- Each component in
CIMis built usingSpringBoot- Client build with cim-client-sdk
- Use
Nettyto build the underlying communication. MetaStoreis used for registration and discovery ofIM-serverservices.
cim-server
IM server is used to receive client connections, message forwarding, message push, etc. Support cluster deployment.
cim-route
Route server; used to process message routing, message forwarding, user login, user offline, and some operation tools (get the number of online users, etc.).
cim-client
IM client terminal, a command can be started and initiated to communicate with others (group chat, private chat).
Flow Chart
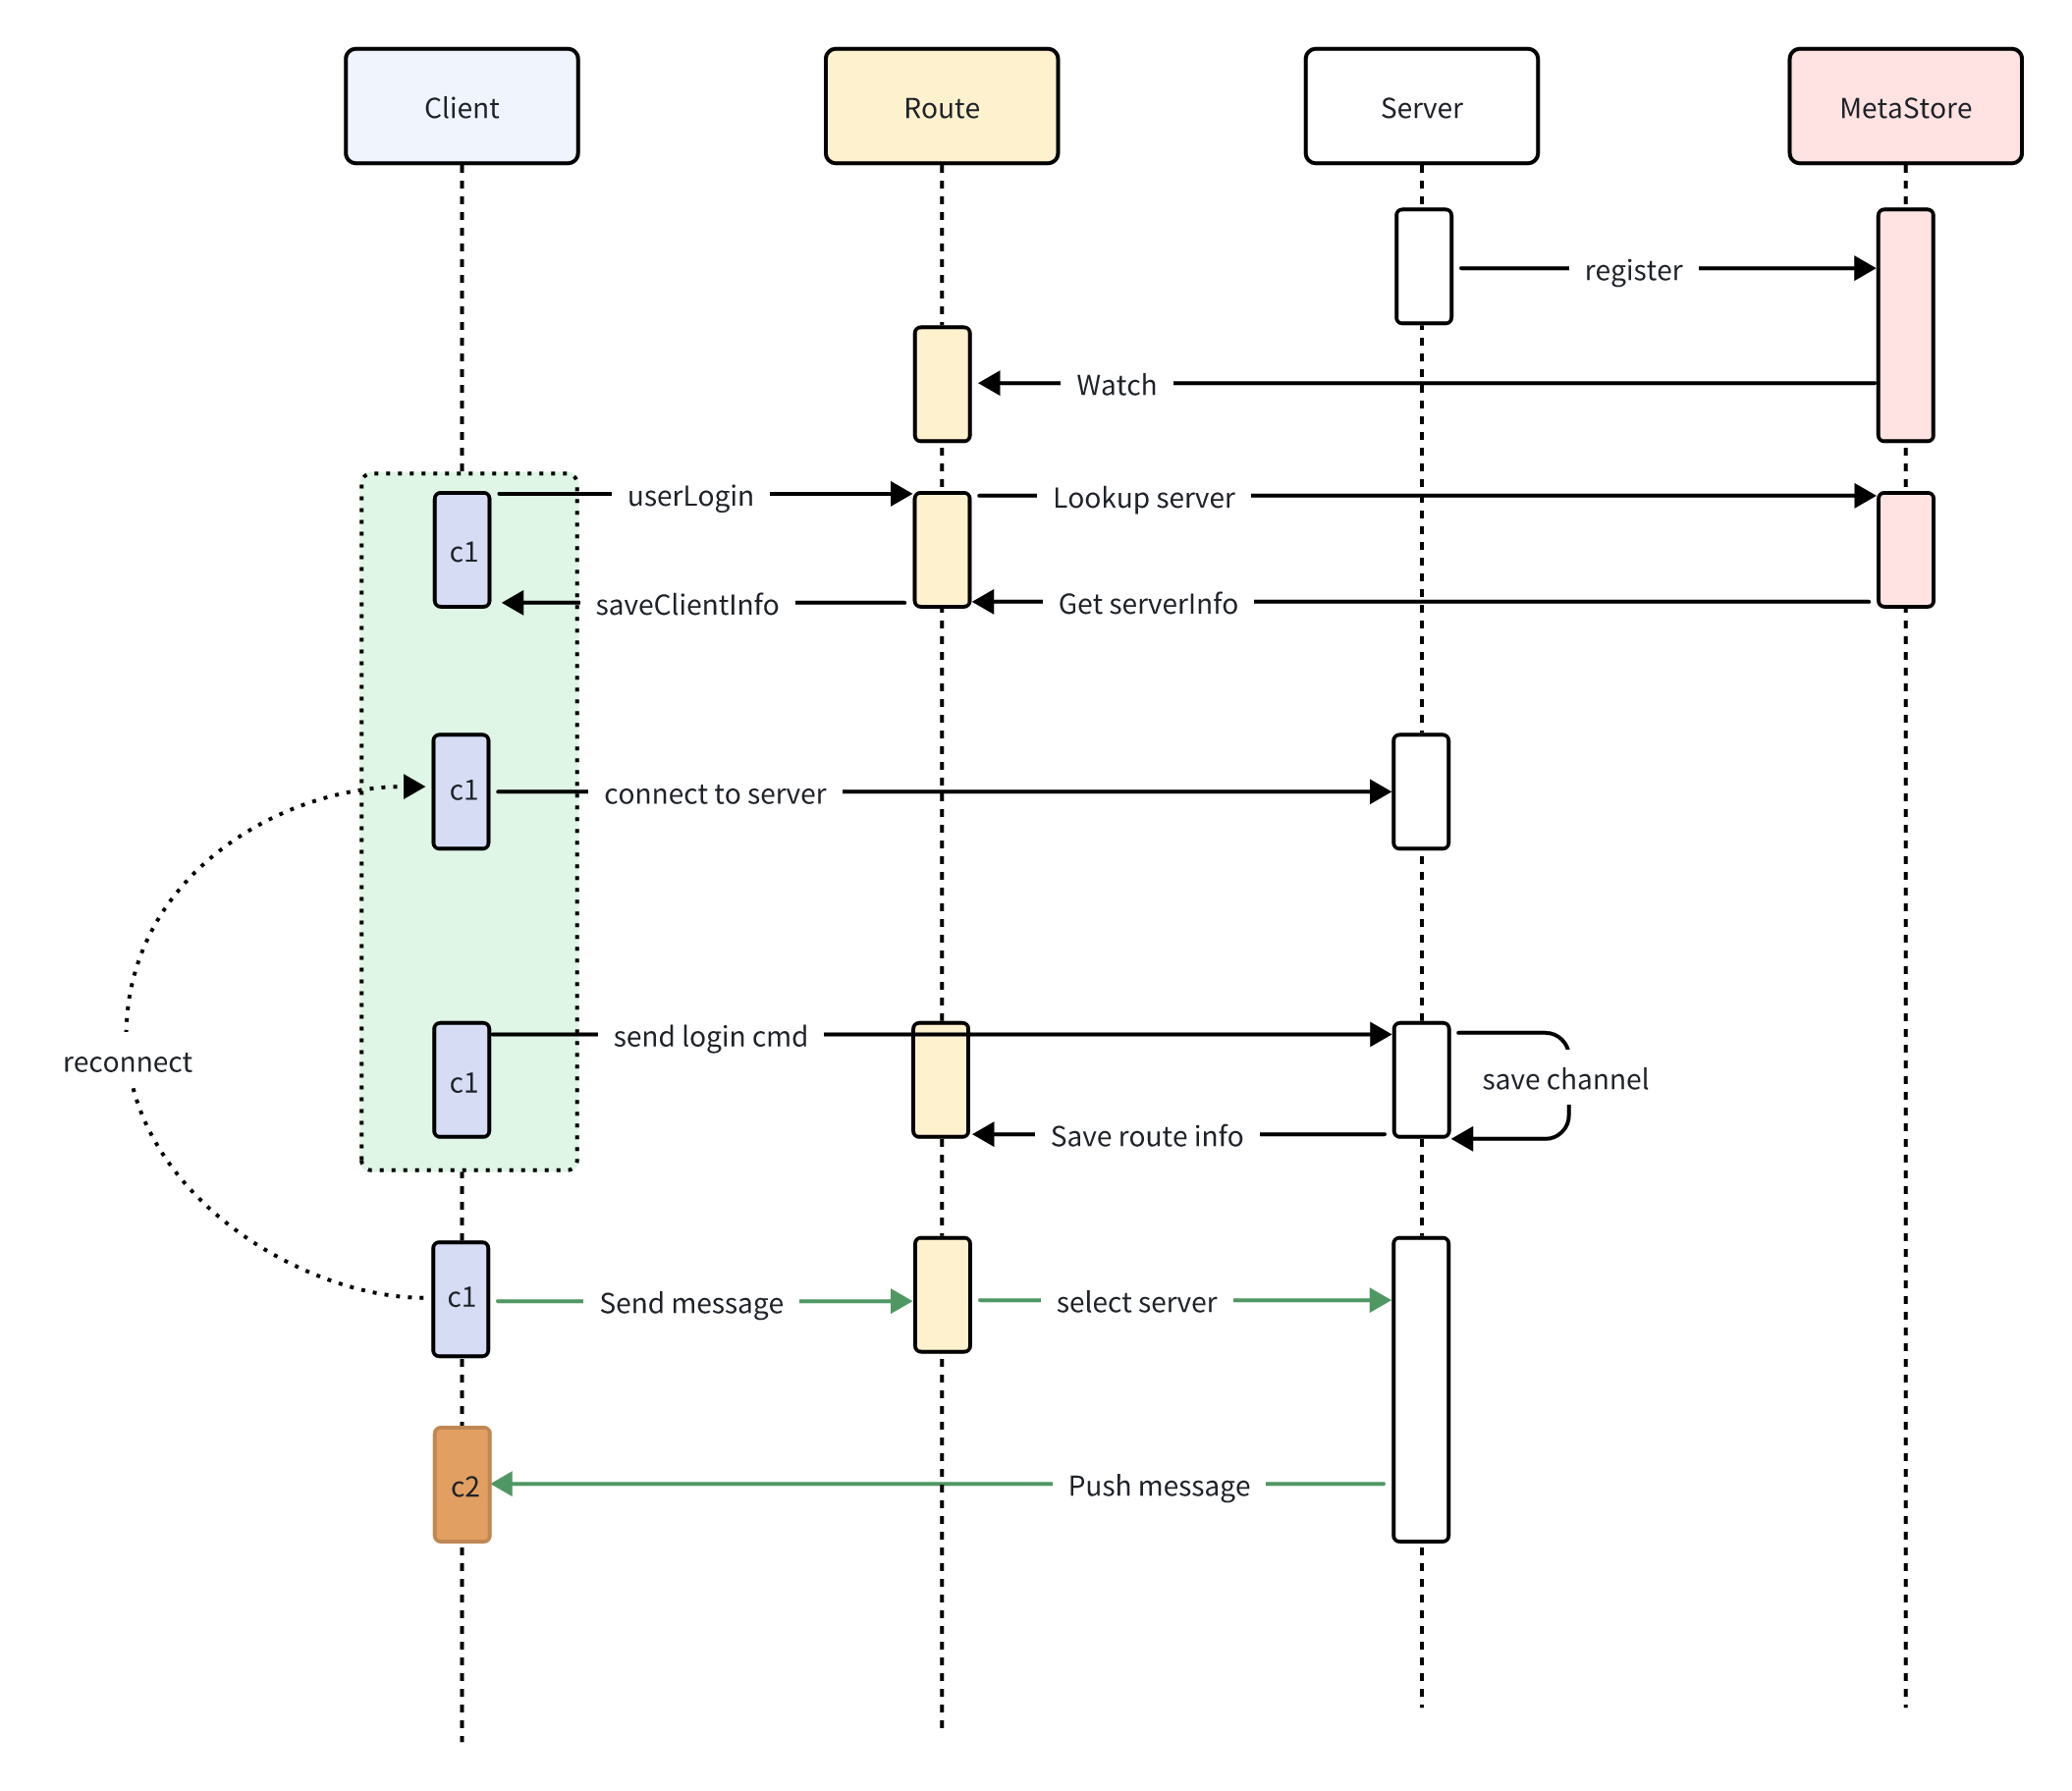
- Server register to
MetaStore - Route subscribe
MetaStore - Client login to Route
- Route get Server info from
MetaStore
- Route get Server info from
- Client open connection to Server
- Client1 send message to Route
- Route select Server and forward message to Server
- Server push message to Client2
Quick Start
Docker
The allin1 image comes with Zookeeper, Redis, cim-server, and cim-forward-route pre-installed, all managed by Supervisor for an out-of-the-box experience.
Supported platforms: linux/amd64, linux/arm64, linux/arm/v7
Port mapping:
| Port | Service | Description |
|---|---|---|
| 2181 | Zookeeper | Service registration & discovery |
| 6379 | Redis | Data caching |
| 8083 | Route Server | HTTP API routing service |
Pull the image and start the container:
docker pull ghcr.io/crossoverjie/allin1-ubuntu:latest
docker run -p 2181:2181 -p 6379:6379 -p 8083:8083 --rm --name cim-allin1 ghcr.io/crossoverjie/allin1-ubuntu:latest
After the container starts, refer to the Register Account and Start Client sections below to experience the full IM workflow.
Build Docker Image Locally
To build the Docker image from source:
# Run from the project root directory
docker build -t cim-allin1:latest -f docker/allin1-ubuntu.Dockerfile .
docker run -p 2181:2181 -p 6379:6379 -p 8083:8083 --rm --name cim-allin1 cim-allin1:latest
Build from Source
First, install Zookeeper and Redis and ensure the network is accessible.
docker run --rm --name zookeeper -d -p 2181:2181 zookeeper:3.9.2
docker run --rm --name redis -d -p 6379:6379 redis:7.4.0
git clone https://github.com/crossoverJie/cim.git
cd cim
mvn clean install -DskipTests=true
cd cim-server && cim-client && cim-forward-route
mvn clean package spring-boot:repackage -DskipTests=true
Deploy IM-server (cim-server)
cp /cim/cim-server/target/cim-server-1.0.0-SNAPSHOT.jar /xx/work/server0/
cd /xx/work/server0/
nohup java -jar  /root/work/server0/cim-server-1.0.0-SNAPSHOT.jar --cim.server.port=9000 --app.zk.addr=<zk-address>  > /root/work/server0/log.file 2>&1 &
For cim-server cluster deployment, just ensure all instances point to the same Zookeeper address.
Deploy Route Server (cim-forward-route)
cp /cim/cim-server/cim-forward-route/target/cim-forward-route-1.0.0-SNAPSHOT.jar /xx/work/route0/
cd /xx/work/route0/
nohup java -jar  /root/work/route0/cim-forward-route-1.0.0-SNAPSHOT.jar --app.zk.addr=<zk-address> --spring.redis.host=<redis-address> --spring.redis.port=6379  > /root/work/route/log.file 2>&1 &
cim-forward-route is stateless and can be deployed on multiple nodes; use Nginx as a reverse proxy.
Start Client
cp /cim/cim-client/target/cim-client-1.0.0-SNAPSHOT.jar /xx/work/route0/
cd /xx/work/route0/
java -jar cim-client-1.0.0-SNAPSHOT.jar --server.port=8084 --cim.user.id=<unique-client-id> --cim.user.userName=<username> --cim.route.url=http://<route-server>:8083/


As shown above, two clients can communicate with each other.
Local Client Startup
Register Account
curl -X POST --header 'Content-Type: application/json' --header 'Accept: application/json' -d '{
  "reqNo": "1234567890",
  "timeStamp": 0,
  "userName": "zhangsan"
}' 'http://<route-server>:8083/registerAccount'
Get the userId from the response:
{
    "code":"9000",
    "message":"success",
    "reqNo":null,
    "dataBody":{
        "userId":1547028929407,
        "userName":"test"
    }
}
Start Local Client
# Start local client
cp /cim/cim-client/target/cim-client-1.0.0-SNAPSHOT.jar /xx/work/route0/
cd /xx/work/route0/
java -jar cim-client-1.0.0-SNAPSHOT.jar --server.port=8084 --cim.user.id=<userId-from-above> --cim.user.userName=<username> --cim.route.url=http://<route-server>:8083/
Built-in Commands
| Command | Description |
|---|---|
:q! |
Quit the client |
:olu |
List all online users |
:all |
Show all available commands |
:q [keyword] |
Search chat history by keyword |
:ai |
Enable AI mode |
:qai |
Disable AI mode |
:pu |
Fuzzy search users |
:info |
Show client information |
:emoji [option] |
Browse emoji list [option: page number] |
:delay [msg] [delayTime] |
Send a delayed message |
: |
More commands are under development... |

Chat History Query

Use the command :q keyword to search chat history related to you.
Client chat history is stored in
/opt/logs/cim/by default, so write permission is required for this directory. You can also customize the directory by adding--cim.msg.logger.path=/custom/pathto the startup command.
AI Mode

Use the command :ai to enable AI mode. After that, all messages will be responded to by AI.
Use :qai to exit AI mode.
Prefix Match Username

Use the command :qu prefix to search user information by prefix.
This feature is primarily designed for searching users in input fields on mobile clients.
Group Chat/Private Chat
Group Chat


For group chat, simply type a message in the console and press Enter to send. All online clients will receive the message.
Private Chat
To send a private message, you need to know the recipient's userID.
Use the command :olu to list all online users.

Then use the format userId;;message content to send a private message.


Meanwhile, the other account will not receive the message.

Emoji Support
Use the command :emoji 1 to list all available emojis. Use the emoji alias to send an emoji.


Delayed Messages
Send a message with a 10-second delay:
:delay delayMsg 10

Contact
Contributing
We welcome contributions! Before submitting a PR, please ensure your code passes the Checkstyle check.
Code Style
This project uses Checkstyle to enforce code style. The rules are defined in checkstyle/checkstyle.xml.
Run Checkstyle locally before committing:
mvn checkstyle:check
Key rules:
- Use spaces around
{,}, and operators - No trailing whitespace
- Files must end with a newline
- Remove unused imports
- Constants (
static final) must beUPPER_SNAKE_CASE - Use Java-style array declarations:
String[] args(notString args[])
Skip Checkstyle for quick builds:
mvn package -Dcheckstyle.skip=true
