StyleTextView
StyleTextView
本文主要探讨 TextView 控件绘制文字,上下会留有一定空白原因.以及使用 canvas.drawText()绘制文字时,baseLine 的该如何确定,如何让文字上下没有留白
最近做项目的时候遇到个问题
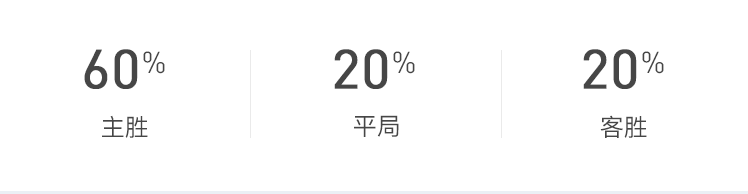
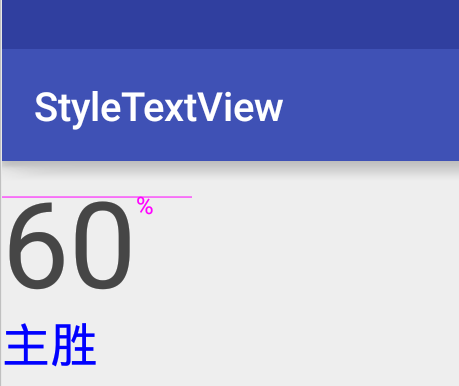
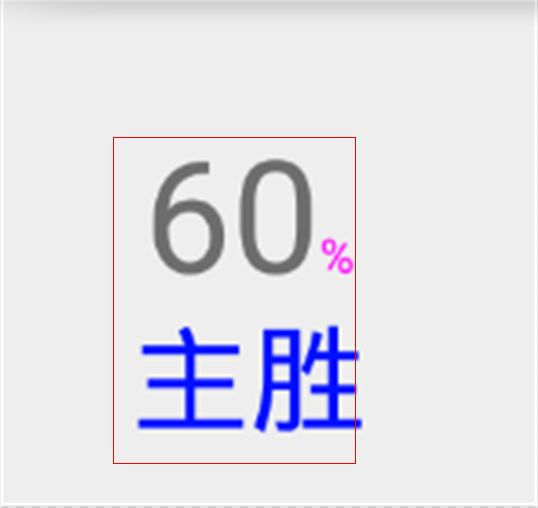
当时的布局是这样的(一言不合就上图,具体代码请点击图片)
什么,这百分号和数字怎么对齐?这数字下面的文字怎么居中?这层级为什么这么复杂,关键外面还有好多层父布局,这是要上天呀!

解决思路
薄荷就是醒脑,表情包还没做完思路就出来.
- 减少层级,采用一个 TextView
<LinearLayout>
    <TextView/>
    <TextView/>
    <TextView/>
</LinearLayout>
- 每个 TextView 的大小,用 SpannableString 控制其大小和颜色.理论上是很简单的,下面是具体的代码
代码:
TextView textView = (TextView) findViewById(R.id._001);
        String text = new String("60%/n 主胜");
        spannableString = new SpannableString(text);
        int size = (int) TypedValue.applyDimension(TypedValue.COMPLEX_UNIT_SP, 12, getResources()
                .getDisplayMetrics());
        spannableString.setSpan(new AbsoluteSizeSpan(size), 2, 3, Spanned
                .SPAN_EXCLUSIVE_EXCLUSIVE);//设置字体大小
        spannableString.setSpan(new ForegroundColorSpan(Color.parseColor("#FF00FF")), 2, 3,
                Spanned.SPAN_EXCLUSIVE_EXCLUSIVE);//设置字体颜色

        int size2 = (int) TypedValue.applyDimension(TypedValue.COMPLEX_UNIT_SP, 30, getResources
                ().getDisplayMetrics());
        spannableString.setSpan(new AbsoluteSizeSpan(size2), text.length() - 2, text.length(),
                Spanned.SPAN_EXCLUSIVE_EXCLUSIVE);//设置字体大小
        spannableString.setSpan(new ForegroundColorSpan(Color.parseColor("#000FFF")), text.length
                () - 2, text.length(), Spanned.SPAN_EXCLUSIVE_EXCLUSIVE);//设置字体颜色
        textView.setText(spannableString);
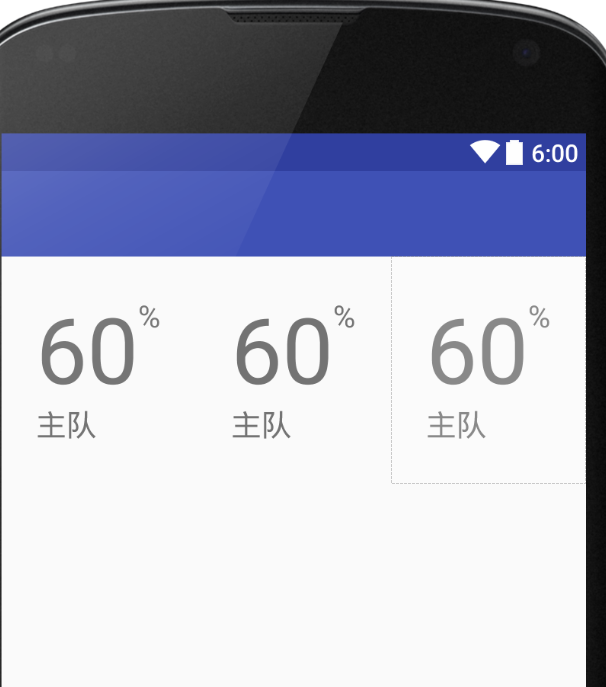
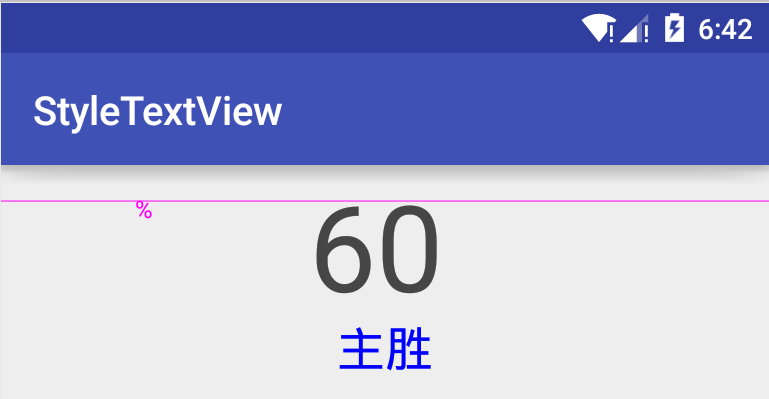
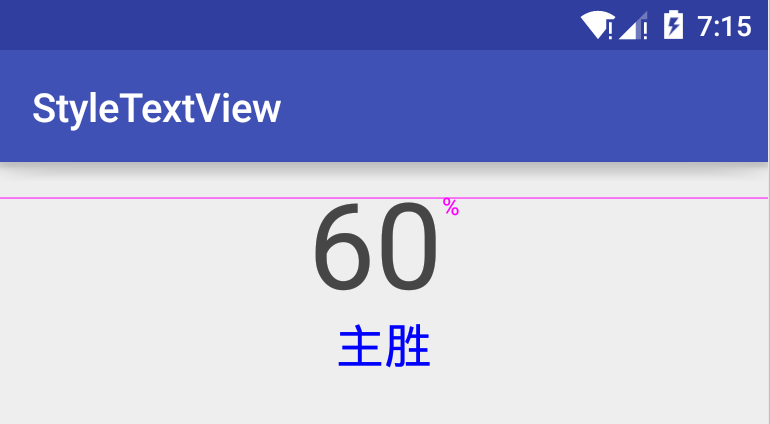
- 最终效果:

实践与理论一样简单,完全不是个事.然后我就兴冲冲的把代码提交了.一切都很顺利,同事还夸我脑子灵活.
当然故事肯定都没有这么简单的,这么简单也什么好写博客的,毕竟天天都有人夸我.
事故
说到事故,先说个故事.
APP 都有个设计,视觉都会有个美女,自从调来了一个美女视觉之后我干活就有劲了,整天乐不思蜀....

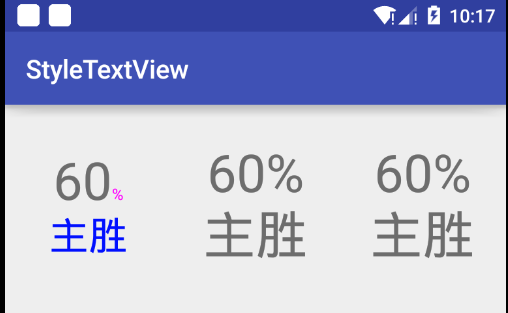
美女的脾气都不好,她说这个%号要靠上,不能靠下.
我好说歹说,说实现起来不容易呀,如果靠上要用复杂的布局,会影响性能...
不行,必须靠上!!!
整个人都斯巴达了,关键是美女没法发脾气,这才是上层把她调过来的真实目的吗?
百分号%下对齐的原因
百分号之所以下对齐,是因为普通图形的绘制,是从图纸的左上角开始绘制的,而文字的绘制则是从左下角开始的.
具体可以看一下 canvas.draw 图形方法,以及 canvas.drawText 方法参数.
问题是知道的,但是没有办法和设计解释,然而也想出好的方法改变 baseLine 绘制. Google 一圈没有答案,群里问了一圈也没有,建议自己定义,看来只好自己动手了.
思路
SpannableString 基本上是可以满足需求的,关键是画%百分号的时候不满足.
看源码看 TextView 是如何利用 SpannableString 画的,覆写其关键代码达到目的
源码老复杂了看不懂.看资料 SpannableString 有一个上标的功能,试了一下上标是相对于本身字体大小来上标的,而 60 与%相差甚远,且无法微调
画百分号%的时候自己画(看来只能这个思路了)
自定义 TextView
- 自定义 StyleTextView 继承 TextView
- 定义类 TextStyle
public static class TextStyle {
        String content;
        int size;
        int color;
        boolean up = false;//是否上标

        public TextStyle() {
        }

        public TextStyle(String content, int size, int color, boolean up) {
            this.content = content;
            this.size = size;
            this.color = color;
            this.up = up;
        }
    }
- 定义方法 setText.
  /**
     * 设置 Text
     * @param content String
     * @param styles
     */
    public void setText(String content, TextStyle... styles) {
        this.content = content;
        spannableString = new SpannableString(content);
        int i = 0;
        for (TextStyle styleContent : styles) {
            if (i == 0) first = styleContent;
            else if (i == 1) second = styleContent;
            i++;
            int start = content.indexOf(styleContent.content);
            int end = start + styleContent.content.length();
            if (styleContent.size != -1)
                spannableString.setSpan(new AbsoluteSizeSpan(styleContent.size), start, end,
                        Spanned.SPAN_EXCLUSIVE_EXCLUSIVE);
            if (styleContent.color != -1)
                spannableString.setSpan(new ForegroundColorSpan(styleContent.color), start, end,
                        Spanned.SPAN_EXCLUSIVE_EXCLUSIVE);
            if (styleContent.up) {//上标时设置颜色为透明色,然后在 onDraw 自己画
                spannableString.setSpan(new ForegroundColorSpan(Color.TRANSPARENT), start, end,
                        Spanned.SPAN_EXCLUSIVE_EXCLUSIVE);
            }
        }
        setText(spannableString);
    }
- 覆写 onDraw 方法
canvas.drawText(content, startX, baseLine, mPaint);
到此自定义 View 完全结束.
外传
故事到这里就结束肯定不叫故事.
上面所有的都并非关键,关键是 drawText()参数.
之前说了,drawText 是从左下角开始画的,所以要计算出 startX 与 baseLine 的值.
startX:计算出百分号之前的"60"的宽度即可.
baseLine:baseLine 默认是等于-top(后文证明),但 TextView 上下有一定的空白,导致直接写-top 不满足需求
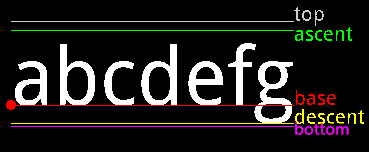
图片来源于网络
当文字字号过大时,空白非常的明显.设计要求"60%"百分号与 60 对齐,所以必须量出空白的高度.
测试上图中的各个属性
按照上图的说法,我们打印一下这几个值
  <TextView
        android:id="@+id/_test"
        android:layout_width="wrap_content"
        android:layout_height="wrap_content"
        android:text="Hello !"
        android:textSize="60sp"/>
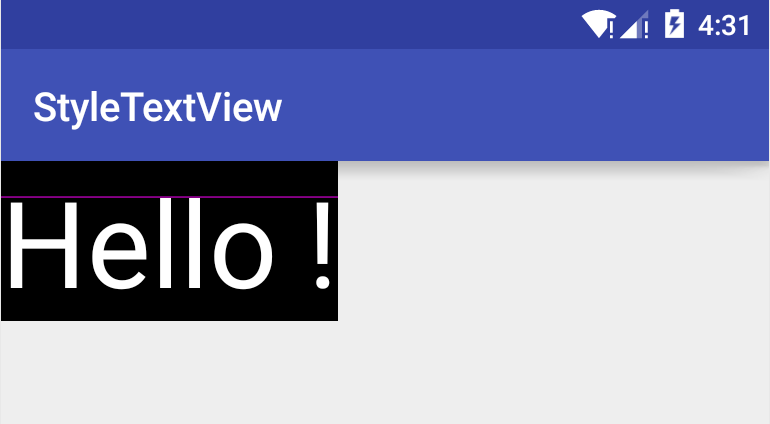
 final TextView textView2 = (TextView) findViewById(R.id._test);
        textView2.setOnClickListener(new View.OnClickListener() {
            @Override
            public void onClick(View v) {
                Paint mPaint = textView2.getPaint();
                Log.e("siyehua", "top: " + mPaint.getFontMetrics().top + "  ascent: " + mPaint
                        .getFontMetrics().ascent + "  descent: " + mPaint.getFontMetrics()
                        .descent + "  " + "bottom: " + mPaint.getFontMetrics().bottom + "  " +
                        "leading: " + mPaint.getFontMetrics().leading + "  /nview-top: " +
                        textView2.getTop() + "  view-bottom: " + textView2.getBottom() + " " +
                        "textSize: " + textView2.getTextSize());
            }
        });
结果如下:(单位 px,后文无特殊说明,单位均默认为像素 px)
top: -126.73828  ascent: -111.328125  descent: 29.296875  bottom: 32.51953  leading: 0.0
view-top: 0  view-bottom: 160 textSize: 120.0
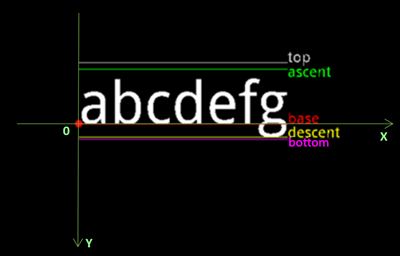
其中 top 与 ascent 是负数,是因为 baseline 是 0.
根据上图,默认状态下,top 与 ascent 在 baseline 上面,而安卓手机的 Y 轴正方向是向下的,故 top 与 ascent 是负数,所以前面提到的 baseline 实际上就等于-top.
按照网上的说法,TextView 的高度实际上是 top 与 bottom 的距离,与结果一致
文字的高度是 ascent 与 descent 之间的距离 111.328125 + 29.296875 ≈ 140.63px,而打印出来的文字的实际大小是 120px,这个结果与预期不符.
- 假设 ascent 与 descent 是动态变化的,可能是"Hello !"这个字符串并没有达到 ascent 的最小值.
我们知道 a 与 b 两个字符绘制的结果,b 明显要冒出一个头.所以有可能是某些字符会突破天际,达到 ascent 与 descent 值
Google 一圈没有发现到底用什么字符测试测试到上限值,但是不妨换一个思考方式,既然无法得到上限,可以突破下限.把 TextView 的字符串改为 ac,看 ascent 与 descent 变化了没有.

- 可见 ascent 与 descent 不是动态变化的,知乎里看过有人提到,TextView 上下有留白,是因为默认添加了一个上下的留白.
TextView 本身包含一定的 FontPadding.看 TextView 的 setIncludeFontPadding()方法.一言不合上代码
 /**
     * Set whether the TextView includes extra top and bottom padding to make
     * room for accents that go above the normal ascent and descent.
     * The default is true.
     *
     * @see #getIncludeFontPadding()
     *
     * @attr ref android.R.styleable#TextView_includeFontPadding
     */
    public void setIncludeFontPadding(boolean includepad) {
        if (mIncludePad != includepad) {
            mIncludePad = includepad;

            if (mLayout != null) {
                nullLayouts();
                requestLayout();
                invalidate();
            }
        }
    }
源码不重要,关键是注释,注释里写默认是有一定的间距的,view 的高度是 top 与 bottom 之间的间距,而设置为 false 之后,view 的高度是 ascent 与 descent 之间的间距 重新设置并打印值
<TextView
        android:id="@+id/_test"
        android:layout_width="wrap_content"
        android:layout_height="wrap_content"
        android:includeFontPadding="false"
        android:text="Hello !"
        android:textSize="60sp"/>
结果 view 的高度等于 ascent 与 descent 之间的高度.
top: -126.73828  ascent: -111.328125  descent: 29.296875  bottom: 32.51953  leading: 0.0
view-top: 0  view-bottom: 140 textSize: 120.0
结果符合源码的解释,同时完善一下上面的关于 baseline 的结论.
假设设置了 android:includeFontPadding="false",则 baseline 实际的值等于-ascent
但是,并没有得到:
ascent 与 descent 之间的距离等于 textSize 的大小.
这个结论.
那会不会是 textSize 的大小实际上指的并不是文字的高度,可能只是一个需要转换的值.

截屏后使用 Mark Man 一量,这文字的高度妥妥的就是 120px.换个说法就是
ascent 与 descent 之间的距离不等于 textSize 的大小/高度.
分析
假设 top 与 ascent 之间的空白是 firstSpace,ascent 与文字顶端的空白是 secondSpace,
则文字最顶端的 Y 坐标 topTextY = firstSpace + secondSpace;(如 TextView 已经设置了 android:includeFontPadding="false"则不需要加上 firstSpace)
firstSpace = ascent - top;
secondSpace = descent - ascent - textSize;
按照这个理论,画一条线.
    @Override
    protected void onDraw(Canvas canvas) {
        super.onDraw(canvas);
        Paint mPaint = getPaint();
        float lineY = mPaint.getFontMetrics().ascent - mPaint.getFontMetrics().top + mPaint
                .getFontMetrics().descent - mPaint.getFontMetrics().ascent - mPaint.getTextSize();
        mPaint.setColor(Color.parseColor("#FF00FF"));
        canvas.drawLine(0, lineY, getWidth(), lineY, mPaint);
    }
非常标准,刚好对齐,深得我意.
所以画百分号的 baseline 等于
baseLine = topTextY + -top(默认状态下,百分号的 baseline) - 百分号的 topTextY;
代码(详情请看自定义的StyleTextView)
 Paint mPaint = getPaint();
            mPaint.setTextSize(first.size);
            float startX = mPaint.measureText(first.content);
            float space = topSpace(mPaint);

            //画顶部基准线
            float lineY = mPaint.getFontMetrics().ascent - mPaint.getFontMetrics().top + mPaint
                    .getFontMetrics().descent - mPaint.getFontMetrics().ascent - mPaint
                    .getTextSize();
            mPaint.setColor(Color.parseColor("#FF00FF"));
            canvas.drawLine(0, lineY, getWidth(), lineY, mPaint);

            //画百分号
            mPaint.setTextSize(second.size);
            float baseLine = space + -mPaint.getFontMetrics().top - topSpace(mPaint);
            mPaint.setColor(second.color);
            canvas.drawText(second.content, startX, baseLine, mPaint);
结果(60 这个字符串本身距离直线有一点间距是因为字不够长,假设使用字母 'l' 刚刚好)
总结
终于要完了吗?实际上还没有

假设 TextView 的宽度是 match_parent,让内容居中
<com.siyehua.styletextview.StyleTextView
        android:id="@+id/tv_content"
        android:layout_width="match_parent"
        android:layout_height="wrap_content"
        android:gravity="center"
        android:text="Hello !"
        android:textSize="60sp"/>
会发现百分号并没有跟着跑,实际上是因为 canvas.drawText()这个方法的参数,startX 与 BaseLine 还受内容的对齐方式影响
而我绘制百分号并没有考虑这方面的因素.
假设 TextView 的对齐方式是居中,则 startX 是 TextView 文字的中点.
图中红框的右边便是文字的右边,而我们需要计算文字右边减去粉色百分号%,得到到即是上标百分号%的 startY
上标 startY = 文字右边 - "%"宽度
文字右边距 = TextView 宽度/2.0f + 需要绘制的文字的宽度/2.0f
需要绘制的文字的宽度 =  "60"串的宽度 + "%"百分号的宽度
startX = getWidth() / 2.0f + (startX + mPaint.measureText(second.content)) / 2.0f -
                    mPaint.measureText(second.content) * 1.5f;
结果
可以看到百分号的已经设置到了正确的位置.
同理可得(其实我懒得算了)
当 TextView 的高度设置 match_parent,且内容设置居中时,需要用同样的方法计算 baseline.
这里就不在举例了.毕竟制作表情包太累了.
就酱紫.如有任何疑问请留言讨论,或者扫下方二维码联系我