RxBus

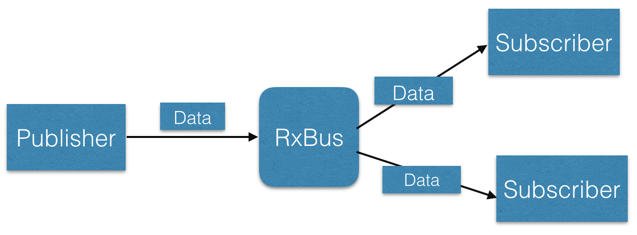
RxBus is a publish/subscribe event bus optimized for Android, like EventBus. RxBus Based on RxJava,it has a simple event bus as EventBus, but also the rich features of Rx Java.
How to use
1.Define EventData:
public static class EventData { /* Additional fields if needed */ }
2.Prepare subscribers: Declare and annotate your subscribing method, it will called in UI thread:
@RegisterBus
public void onEventData(EventData data) {/* Do something */};
3.Register and unregister your subscriber. For example on Android, activities and fragments should usually register according to their life cycle:
@Override
protected void onCreate(Bundle savedInstanceState) {
    super.onCreate(savedInstanceState);
    setContentView(R.layout.activity_main);
    initView();
    // register to RxBus
    RxBus.getInstance().register(this);
}

@Override
protected void onDestroy() {
    super.onDestroy();
    // unregister from RxBus
    RxBus.getInstance().unRegister(this);
}
3.Post events:
    // send data in thread
     Data data = new Data();
     Data.setContent("hello world");
     RxBus.getInstance().send(data);
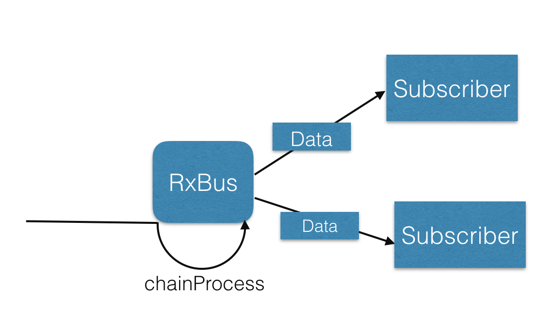
Advantages other than EventBus
RxBus provides chainProcess method to wrap a process, and the results will be sent to the subscriber.
Chain process in model layer
 RxBus.getInstance().chainProcess(new Func1() {
     @Override
     public Object call(Object o) {
         // do something in IO thread, the return data can be subscribe and receive.
         // getUser() is a IO/net process
         User user = getUser();
         user.setId(uid);
         user.setName("大利猫");
         return user;
     }
 });
Then in UI thread:
    /**
     * @RegisterBus mark this method to receive data in UI thread
     * @param user
    */

    @RegisterBus

    public void onUser(User user) {

       userView.showUser(user);

    }
Gradle independence
Step 1. Add the JitPack repository to your build file, Add it in your root build.gradle at the end of repositories:
       allprojects {
           repositories {
               ...
               maven { url 'https://jitpack.io' }
           }
       }
Step 2. Add the dependency
       dependencies {
           compile 'com.github.liuguangli:RxBus:1.1'
       }
License
MIT License
Copyright (c) 2017 刘光利
Permission is hereby granted, free of charge, to any person obtaining a copy of this software and associated documentation files (the "Software"), to deal in the Software without restriction, including without limitation the rights to use, copy, modify, merge, publish, distribute, sublicense, and/or sell copies of the Software, and to permit persons to whom the Software is furnished to do so, subject to the following conditions:
The above copyright notice and this permission notice shall be included in all copies or substantial portions of the Software.
THE SOFTWARE IS PROVIDED "AS IS", WITHOUT WARRANTY OF ANY KIND, EXPRESS OR IMPLIED, INCLUDING BUT NOT LIMITED TO THE WARRANTIES OF MERCHANTABILITY, FITNESS FOR A PARTICULAR PURPOSE AND NONINFRINGEMENT. IN NO EVENT SHALL THE AUTHORS OR COPYRIGHT HOLDERS BE LIABLE FOR ANY CLAIM, DAMAGES OR OTHER LIABILITY, WHETHER IN AN ACTION OF CONTRACT, TORT OR OTHERWISE, ARISING FROM, OUT OF OR IN CONNECTION WITH THE SOFTWARE OR THE USE OR OTHER DEALINGS IN THE
