AndroidShell
Table of Contents
- SHA-1
- ADB
- Select a device when multiple devices are connected
- Server actions
- Show launcher activity cold start time
- Database
- Watching StrictMode
- View connected devices
- List of running services
- Install an application
- Uninstall an application
- Start an Activity
- Open a deep linking intent
- Take an screenshot
- Power button
- Unlock screen
- Print all installed packages
- Get the path of an installed application
- Simulate application being killed
- Screen recording using Android 4.4
- Check battery stats
- Auto Backup Data (only in Android M)
- Simulate fingerprint inputs (only in Android M)
- Filter by tagname in Logcat
- Filter by priority in Logcat
- Filter using grep in Logcat
- See the executed SQL statements in plain text in Logcat
- Testing - Execute Monkey to test user interaction
- Find out processor version on Android Device (check if it's an ARM, for example)
- Test Alarms
- Query a Content Provider
- Find out Application Binary Interface (ABI) in different devices
- Retrieve application's private data and databases for non debug application without root access
- Indentify Frame Rate Issues (Dumpsys)
- Use ADB over Wi-Fi without extra application or software
- Test new Marshmallow permissions
- Testing your app with App Standby
- Testing your app with Doze
- Enabling Night Mode on Android Nougat
- Copy files from/to a device/emulator
- Trigger a notification without GCM
- AAPT
SHA-1
In order to get SHA1 to use it in many services, like Google+ Sign In, Maps, In app purchases, we should generate keys for every keystore (certificate):
Debug KeyStore
$ keytool -list -v -keystore ~/.android/debug.keystore -alias androiddebugkey -storepass android -keypass android
or
$ keytool -list -v -keystore {path_to_keystore}/debug.keystore -alias androiddebugkey -storepass android -keypass android
Release KeyStore
$ keytool -list -v -keystore {path_to_keystore}/my-release.keystore -alias {alias_name} -storepass {store_pass} -keypass {keypass}
ADB
Select a device when multiple devices are connected
You can use adb devices -l to check information related to them, in order to select the one you want. Then:
adb -s <device-serial> <instructions>
where <device-serial> is the number listed when you use adb devices and <instructions> are the instructions you want to execute over the device.
Server actions
The following command kills the adb server:
adb kill-server
This starts the adb server:
adb start-server
Show launcher activity cold start time
$ adb logcat | grep "ActivityManager"
The output would be something similar to:
ActivityManager: Displayed com.example.launchtime/: +666ms
If we also use want to show the content ready time, we should use the API method reportFullyDrawn:
ActivityCompatAdditions.reportFullyDrawn(this);
Then the time output will be the actual time that takes to Activity to be ready:
ActivityManager: Displayed com.example.launchtime/.LaunchTimeActivity: +666ms
ActivityManager: Fully drawn com.example.launchtime/.LaunchTimeActivity: +1s440ms
Amount of time that takes to draw the first frame + the content.
We can also use the Activity start command from ADB, with the W flag:
adb shell am start -W com.package.name/.LauncherScreenActivity
We will see 3 times related to starting times.
Database
This is a Database getter script, developed by Ignasi
#!/bin/bash

# android 4.3+ changes app's internal directory permissions and you can not just pull your
# databases to your computer, so this is a workaround to extract your databases.
# I only use it for debug, use it under YOUR responsability. IT REQUIRES ROOT

package=$1
db_name=$2
path="/data/data/$package/"

rm $db_name
adb shell "su -c 'cd $path; chmod -R 777 databases; exit'; exit"
adb pull $path/databases/$db_name
open $db_name
Watching StrictMode
If you’re using penaltyLog(), the default, just run
$ adb logcat
and watch the terminal output. Any violations will be logged to your console, slightly rate-limited for duplicate elimination.
If you want to get fancier, turn on penaltyDropbox() and they’ll be written to the DropBoxManager, where you can extract them later with
$ adb shell dumpsys dropbox data_app_strictmode --print
View connected device
$ adb devices
If multiple devices are attached, use adb -s DEVICE_ID to target a specific device
List of running services
$ adb shell dumpsys activity services
Install an application
$ adb install -r file.apk // (or com.package.name)
# optional -r argument reinstalls and keeps any data if the application is already installed on the device.
# optional -s argument installs the app on the SD card instead of the internal storage.
Uninstall an application
$ adb uninstall com.package.name
To uninstall the application using uninstall dialog:
$ adb shell am start -a android.intent.action.DELETE -d package:com.package.name
To keep the data in the cache directory, add -k
$ adb uninstall -k com.package.name
Start an Activity
$ adb shell am start -n com.package.name/.ActivityName
$ adb shell am start -n com.package.name/com.package.name.ActivityName
Open a deep linking intent
$ adb shell am start -n android.intent.action.VIEW -d "scheme://app/deep/linking"
or
$ adb shell am start -n android.intent.action.VIEW -d "https://name.app/user-settings/324" com.packaging.app
Take an screenshot
$ adb shell screencap -p | perl -pe 's/\x0D\x0A/\x0A/g' > screen_name.png
Explanation of this command, here
Power button
This command sends the power button event to turn the device ON/OFF.
$ adb shell input keyevent 26
$ adb shell inout text "KEYCODE_POWER"
Unlock screen
This command sends the event that unlocks the lockscreen on the device. It can be combined with the power button command above to turn on and unlock the device
$ adb shell input keyevent 82
$ adb shell inout text "KEYCODE_MENU"

$ adb shell input keyevent 26 82
$ adb shell inout text "KEYCODE_POWER" "KEYCODE_MENU"
Print all installed packages
$ adb shell pm list packages -f
Get the path of an installed application
$ adb shell pm path app.package.application-name
Simulate application being killed
# exit your app using home button
# After that.
$ adb shell ps // Find the process id
$ adb shell ps | grep your.app.package // Then find the line with app name package
$ adb shell kill -9 21997 // Kill the app by PID
# Now return to the app using the task switcher.
Screen recording using Android 4.4
$ adb shell screenrecord --verbose /sdcard/nexus5.mp4 // Basic recording from shell
# Press Ctrl-C to stop.
$ screenrecord --verbose --time-limit 30 /sdcard/nexus5.mp4 // Recording for 30 seconds
$ screenrecord --verbose --bit-rate 8000000 --time-limit 30 /sdcard/nexus5.mp4 // Recording for 30 seconds with 8Mbps bitrate
$ screenrecord --verbose --rotate /sdcard/nexus5.mp4 // Record in portrait view / horizontal
Check battery stats
$ adb shell dumpsys batterystats
# Global and per-UID statistics.
# Options: --help.
Auto Backup Data (only in Android M)
$ adb shell bmgr

$ adb shell bmgr run
# Do some work in the app.
$ adb shell bmgr fullbackup com.domain.android.app_name
# Uninstall and reinstall the app.
$ adb shell bmgr restore com.domain.android.app_name
Simulate fingerprint inputs (only in Android M)
$ adb -e emu finger touch 1
Filter by tagname in Logcat
$ adb logcat -s TAG_NAME
$ adb logcat -s TAG_NAME_1 TAG_NAME_2
Filter by priority in Logcat
$ adb logcat "*:<priority>"
# Where <priority> can be V (Verbose), D (Debug), I (Info), W (Warning), E (Error), F (Fatal), S (Silent).
It can be combined with tagname command, to filter by tagname and priority
$ adb logcat -s TEST: W
Filter using grep in Logcat
$ adb logcat | grep "term"
$ adb logcat | grep "term1\|term2"
`
See the executed SQL statements in plain text in Logcat
$ adb shell setprop log.tag.SQLiteLog V
$ adb shell setprop log.tag.SQLiteStatements V
$ adb shell stop
$ adb shell start
That's it. Whenever any of the installed apps now accesses the database you should see the executed statement in the log output.
Testing - Execute Monkey to test user interaction
The Monkey is a program that runs on your emulator or device and generates pseudo-random streams of user events such as clicks, touches, or gestures, as well as a number of system-level events. You can use the Monkey to stress-test applications that you are developing, in a random yet repeatable manner.
$ adb shell monkey [options] <event-count>
# Basic, make 500 random actions.
$ adb shell monkey -p your.package.name -v 500
Complete information at http://developer.android.com/tools/help/monkey.html
Find out processor version on Android Device (check if it's an ARM, for example)
$ adb shell cat /proc/cpuinfo
Test Alarms
To check the alarms that are set on the connected device and to know more about them:
$ adb shell dumpsys alarm
To see the alarms from you app you can grep with your package keywords:
$ adb shell dumpsys alarm | grep -A 3 google
So now you can see if you have correctly implemented your alarms functionality using AlarmManager API.
Query a Content Provider
$ adb shell content query --uri content://your.package.name --projection name
Find out Application Binary Interface (ABI) in different devices
ABI (Application Binary Interface) is gonna tell us if an Android device support 64-bit. So using the next command the developer know if the device is 32-bit or 64-bit based.
$ adb shell getprop ro.product.cpu.abi\
Retrieve application's private data and databases for non debug application without root access
# Get a backup of your application data.
$ adb backup --apk com.package.name
# Change the .ab in .tar.
$ dd if=backup.ab bs=24 skip=1 | openssl zlib -d > backup.tar
# Untar  backup.tar.
tar xfv backup.tar
# Go in you app private dir.
$ cd apps/com.package.name
You'll need :
- adb activated
- physical access to unlocked device
- works on Nexus 5 at least, might not work with other devices. allowBackup=false will break thos method
Indentify Frame Rate Issues (Dumpsys)
$ cd platform-tools/
# Before executing next command, go to Settings --> Developer Options --> Enable Profile GPU rendering option.
# And make sure to kill your application first or at least to kill the window that you want to profile, and then you run the command:
$ adb shell dumpsys gfxinfo
Purpose of Dumpsys is identifying frame rate issues and fix them.
What matter is the three columns shown. Copy paste results in a spreadsheet. And you will get a result like this one:
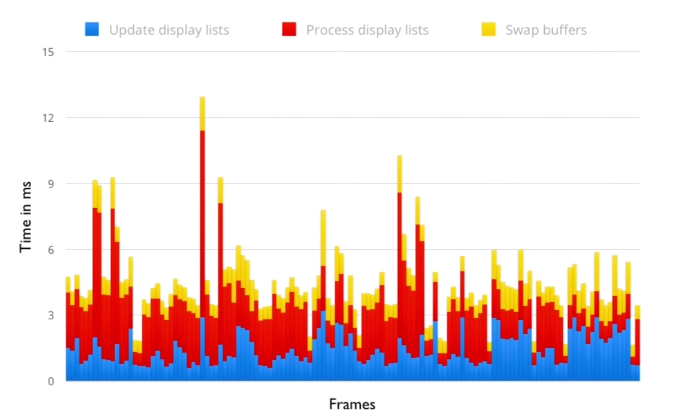
This is the data you can grab. You can create a stack graph, so every bar contains the sum of the three columns on the left in the data we output. Is the time it takes to update the display list on every frame.
- The middle column is called process display list. It's the time we take to draw the actual display list
- The last column is the time we take to swap the buffers, so to give the buffer back to surface flinger. Scrolling or doing any kind of actions should be below 16 millisecond limit. So this app is running at 60FPS, we're vsync'd, everything is going great. You can see that most of the time, you should spend most of the time in process display list, so drawing, executing the display list should be where you spend the bulk of the time.
- The blue part is your code. When you write your Java code, your
onDraw()method, and this is where you can do most of the optimizations
There is a distinction between the GPU composition with frame buffers and overlays. So you can use a tool called dumpsys surface flinger to see the state of overlays and frame buffers in the system.
$ adb shell dumpsys SurfaceFlinger
You're going to get a list with all the windows currently visible on the screen.
More info about this tool, here
Use ADB over Wi-Fi without extra application or software
Prerequisites Android device and computer should be connected in same network.
- Connect Android device with USB cable to computer
Use following command in terminal to make sure adb is running in USB mode.
$ adb usb
# Restarting in USB mode.
# Connect to the device over USB.
Execute following command in terminal to make sure adb identify/list gets connected with the device.
$ adb devicesChange adb mode from USB to tcpip using following command.
$ adb tcpip 5555
# Restarting in TCP mode port: 5555.
Now, adb is running over TCP/IP mode, Let’s find IP address of Android device. Go to Settings in Android device -> About -> Status -> IP address. note down the IP address of connected Android Device.
Use following command to connect ADB with IP address
$ adb connect #.#.#.#
# Connected to #.#.#.#:5555.
Now adb is working over Wi-fi, You can remove USB cable from Android device.
- To confirm adb is working over Wi-fi and your device is still connect. you can use following command
$ adb devices
*.*.*.*:5555 device
You’re now ready to go!, Enjoy ADB over Wi-fi. Use following command to change ADB mode to USB
$ adb usb
Test new Marshmallow permissions
In order to test permissions targeting API 23+, we could use following commands to programatically grant and revoke permissions on the device:
$adb pm grant <package_name> <permission_name>
or
$adb pm revoke <package_name> <permission_name>
Testing your app with App Standby
To test the App Standby mode with your app:
- Configure a hardware device or virtual device with an Android 6.0 (API level 23) or higher system image.
- Connect the device to your development machine and install your app.
- Run your app and leave it active.
Force the app into App Standby mode by running the following commands:
$ adb shell dumpsys battery unplug
$ adb shell am set-inactive <packageName> true
Simulate waking your app using the following commands:
$ adb shell am set-inactive <packageName> false
$ adb shell am get-inactive <packageName>
Observe the behavior of your app after waking it. Make sure the app recovers gracefully from standby mode. In particular, you should check if your app's Notifications and background jobs continue to function as expected.
Testing your app with Doze
You can test Doze mode by following these steps:
- Configure a hardware device or virtual device with an Android 6.0 (API level 23) or higher system image.
- Connect the device to your development machine and install your app.
- Run your app and leave it active.
- Shut off the device screen. (The app remains active.)
- Force the system to cycle through Doze modes by running the following commands:
$ adb shell dumpsys battery unplug
$ adb shell dumpsys deviceidle step
You may need to run the second command more than once. Repeat it until the device state changes to idle.
- Observe the behavior of your app after you reactivate the device. Make sure the app recovers gracefully when the device exits Doze.
Enabling Night Mode on Android Nougat
$ adb -d shell am start --ez show_night_mode true com.android.systemui/.tuner.TunerActivity
Copy files from/to a device/emulator
To push a file/dir to device:
$ adb push <local> <remote>
where <local> is file in your local system i.e my_image.png and <remote> is file location in device/emulator i.e /sdcard/Downloads/my_image.png
Sample:
$ adb push ~/Downloads/my_image.png /sdcard/Downloads/my_image.png
To pull a file/dir from device
$ adb pull <remote> [<local>]
where <local> is file in your local system i.e my_image.png and <remote> is file location in device/emulator i.e /sdcard/Downloads/my_image.png.
Sample:
adb pull /sdcard/Downloads/my_image.png my_image.png
Trigger a notification without GCM
IMPORTANT: Remember to remove temporally the following attribute from the declaration of the Broadcast Receiver you want to test, in the Manifest:
android:permission="com.google.android.c2dm.permission.SEND"
It's based on enabling broadcast receivers.
am broadcast -a <Intent-Name> -n <Package>/<Receiver-Name-with-leading-dot> <Extras>
Some examples could be:
adb shell am broadcast -a com.whereismywifeserver.intent.TEST --es sms_body "test from adb"
adb shell am broadcast -a com.google.android.c2dm.intent.REGISTRATION -n de.example/.GCMBroadcastReceiver
--es "registration_id" "1234"
where --es define extra as string
AAPT
Check Permissions in order to avoid Play Store app filtering
Certain permissions also imply certain features. Google Play uses these to filter out apps just as it would with explicit requirements. Developers should NOT rely on this implicit behavior, they should always declare explicitly every feature their app needs.
aapt allows us, among other things, to see the contents of an app’s manifest. This is not as easy as simply unpacking the apk and reading the manifest as you’ll find it’s in a binary format. Here is the result of running the SDK-provided aapt tool in its apk:
$ aapt dump badging com.your-app.apk
Output
package: name='com.germanwings.android' versionCode='3' versionName='1.0.2' sdkVersion:'10' targetSdkVersion:'17'
uses-permission:'android.permission.WRITE_EXTERNAL_STORAGE'
uses-permission:'android.permission.INTERNET'
uses-permission:'android.permission.ACCESS_FINE_LOCATION'
uses-permission:'android.permission.ACCESS_COARSE_LOCATION'
uses-permission:'com.germanwings.android.permission.C2D_MESSAGE'
uses-permission:'android.permission.ACCESS_LOCATION_EXTRA_COMMANDS'
uses-permission:'android.permission.INTERNET'
uses-permission:'android.permission.GET_ACCOUNTS'
uses-permission:'android.permission.WAKE_LOCK'
uses-permission:'android.permission.READ_PHONE_STATE'
uses-permission:'com.google.android.c2dm.permission.RECEIVE'
uses-permission:'android.permission.ACCESS_LOCATION_EXTRA_COMMANDS'
uses-permission:'android.permission.ACCESS_MOCK_LOCATION'
uses-permission:'android.permission.ACCESS_NETWORK_STATE'
uses-permission:'android.permission.ACCESS_GPS'
uses-permission:'android.permission.ACCESS_LOCATION'
uses-permission:'android.permission.READ_EXTERNAL_STORAGE'
application-label:'Germanwings'
application-icon-120:'res/drawable-ldpi/ic_launcher.png'
application-icon-160:'res/drawable-mdpi/ic_launcher.png'
application-icon-240:'res/drawable-hdpi/ic_launcher.png'
application-icon-320:'res/drawable-xhdpi/ic_launcher.png'
application: label='Germanwings' icon='res/drawable-mdpi/ic_launcher.png'
launchable-activity: name='com.germanwings.android.presentation.activity.DashboardActivity' label='Germanwings' icon=''
uses-feature:'android.hardware.location'
uses-implied-feature:'android.hardware.location','requested a location access permission'
uses-feature:'android.hardware.location.gps'
uses-implied-feature:'android.hardware.location.gps','requested android.permission.ACCESS_FINE_LOCATION permission'
uses-feature:'android.hardware.location.network'
uses-implied-feature:'android.hardware.location.network','requested android.permission.ACCESS_COURSE_LOCATION permission'
uses-feature:'android.hardware.touchscreen'
uses-implied-feature:'android.hardware.touchscreen','assumed you require a touch screen unless explicitly made optional'
uses-feature:'android.hardware.screen.portrait'
uses-implied-feature:'android.hardware.screen.portrait','one or more activities have specified a portrait orientation'
main
other-activities
other-receivers
other-services
supports-screens: 'small' 'normal' 'large' 'xlarge'
supports-any-density: 'true'
locales: '--_--'
densities: '120' '160' '240' '320'
